![]()
Many Mac users are unaware that copying a file or folder in the Finder, or moving it to another location, does not preserve the permissions and ownership data attached to it.
In most circumstances, that’s not a problem as you’ll be moving stuff within your own user account. Hence, the default behavior of changing ownership/permissions is actually desirable for most users, in most cases.
But on occasion, you may need to override the default setting when, say, copying a file into another user’s folder, dropping a document into the Guest account and so forth. In these kinds of scenarios, preserving the original file’s ownership and permissions can save you headache down the road.
But worry not — the Mac’s Finder includes a pair of hidden features, Paste Item Exactly and Duplicate Exactly, that get the job done. The following tips will teach you how to leverage them to ensure that the file’s ownership information and permission data has been kept intact after the copy/move operation.
Again, Finder defaults to changing the original ownership and permissions to your account, if the file being copied or moved is owned by another user. In my experience, preserving the original permissions can help maintain the file system integrity and consistency and save you trouble down the road.
To copy, move or duplicate a file without the current user becoming the new owner, use either the Finder’s Paste Item Exactly or Duplicate Exactly feature.
How to copy a file while preserving ownerships and permissions
To make a copy of a file or folder in a new location while preserving ownership and permissions of the original item, follow the steps outlined below.
Step 1: Open a new window by clicking the Finder icon in the Dock, or hit the ⌘-Shift-F combo with the Finder active. Now, locate the item you wish to move to a new location.
Step 2: Right-click the item (or Control + click) and choose “Copy (filename)” from the drop-down menu. Here you can see me copying iDownloadBlog’s style guide to the system clipboard.
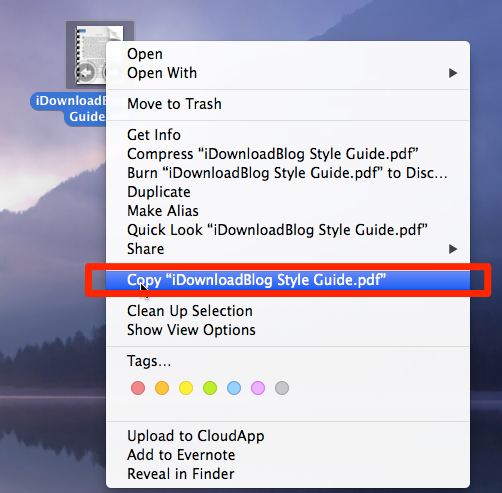
Tip: alternatively, select an item and hit ⌘-C to copy it to the system’s clipboard buffer.
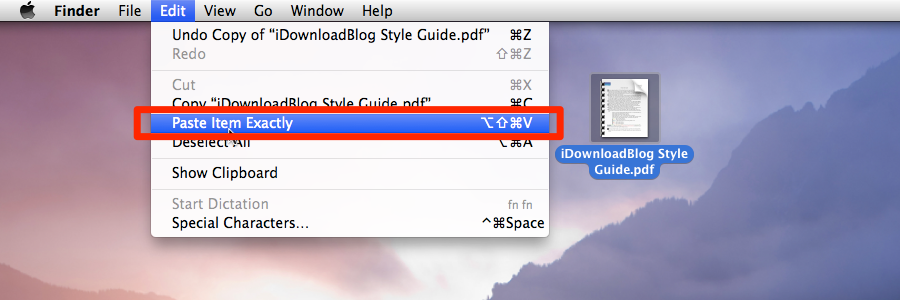
Step 3: Open a destination folder and access the Finder’s Edit menu while holding down Shift and Option keys on the keyboard. Now choose “Paste Item Exactly” which will move the item to this location while maintaining permissions and ownership data.
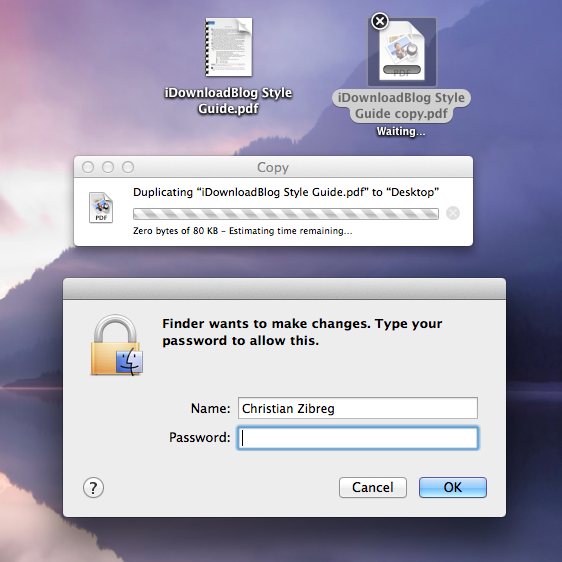
You may be asked to provide your account credentials to complete the operation.
Tip: you can also hit the ⌘-Shift-Option-V to paste to the destination location.
How to duplicate a file while preserving ownerships and permissions
To make a copy of a file or folder in the same location while preserving the original’s ownership and permission information, follow the steps outlined below.
Step 1: Open the Finder window, locate an item you wish to duplicate and click to highlight it.
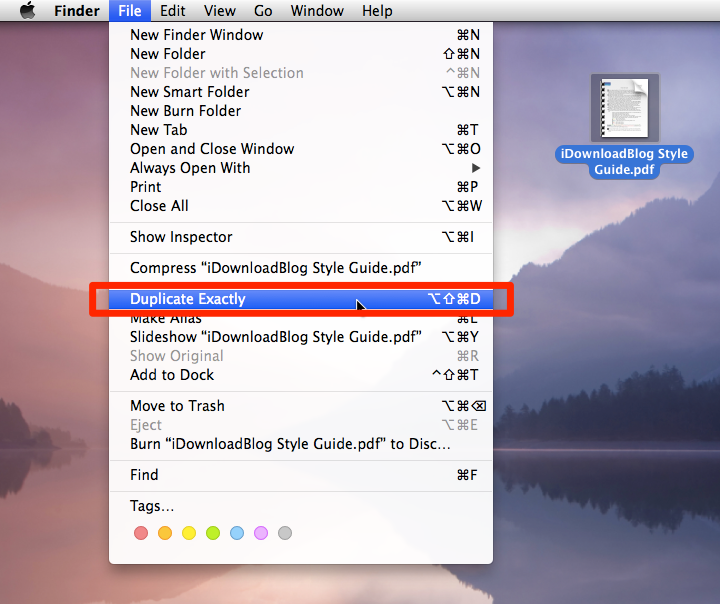
Step 2: Hold down Shift and Option keys on the keyboard while accessing the Finder’s File menu. Choose “Duplicate Exactly” to create an exact replica of the item in the same location as the original.
Again, the system may ask you to authenticate before completing the file duplication.
Tip: you can achieve the same results by hitting the ⌘-Option-Shift-D keyboard combination.
These instructions apply to the Finder on OS X Yosemite systems, too.
It goes without saying that performing the copy/paste/duplicate operation the old-fashioned way, without using the Shift/Option keyboard modifiers, will make your account the new file owner and change the permissions accordingly.
The difference between moving a file or folder and creating a duplicate?
The former obviously moves it to a new location in your Mac’s file system. Similarly, the latter performs an exact duplication and places the new file alongside the original.
Like this tip?
Give us a shout in the comments and browse our extensive how-to archive!
If you’ve stumbled upon another tip worth sharing, or just want to suggest topics for upcoming how-tos, drop us a line at tips@iDownloadBlog.com and we’ll feature your best and brightest ideas in upcoming tutorials.