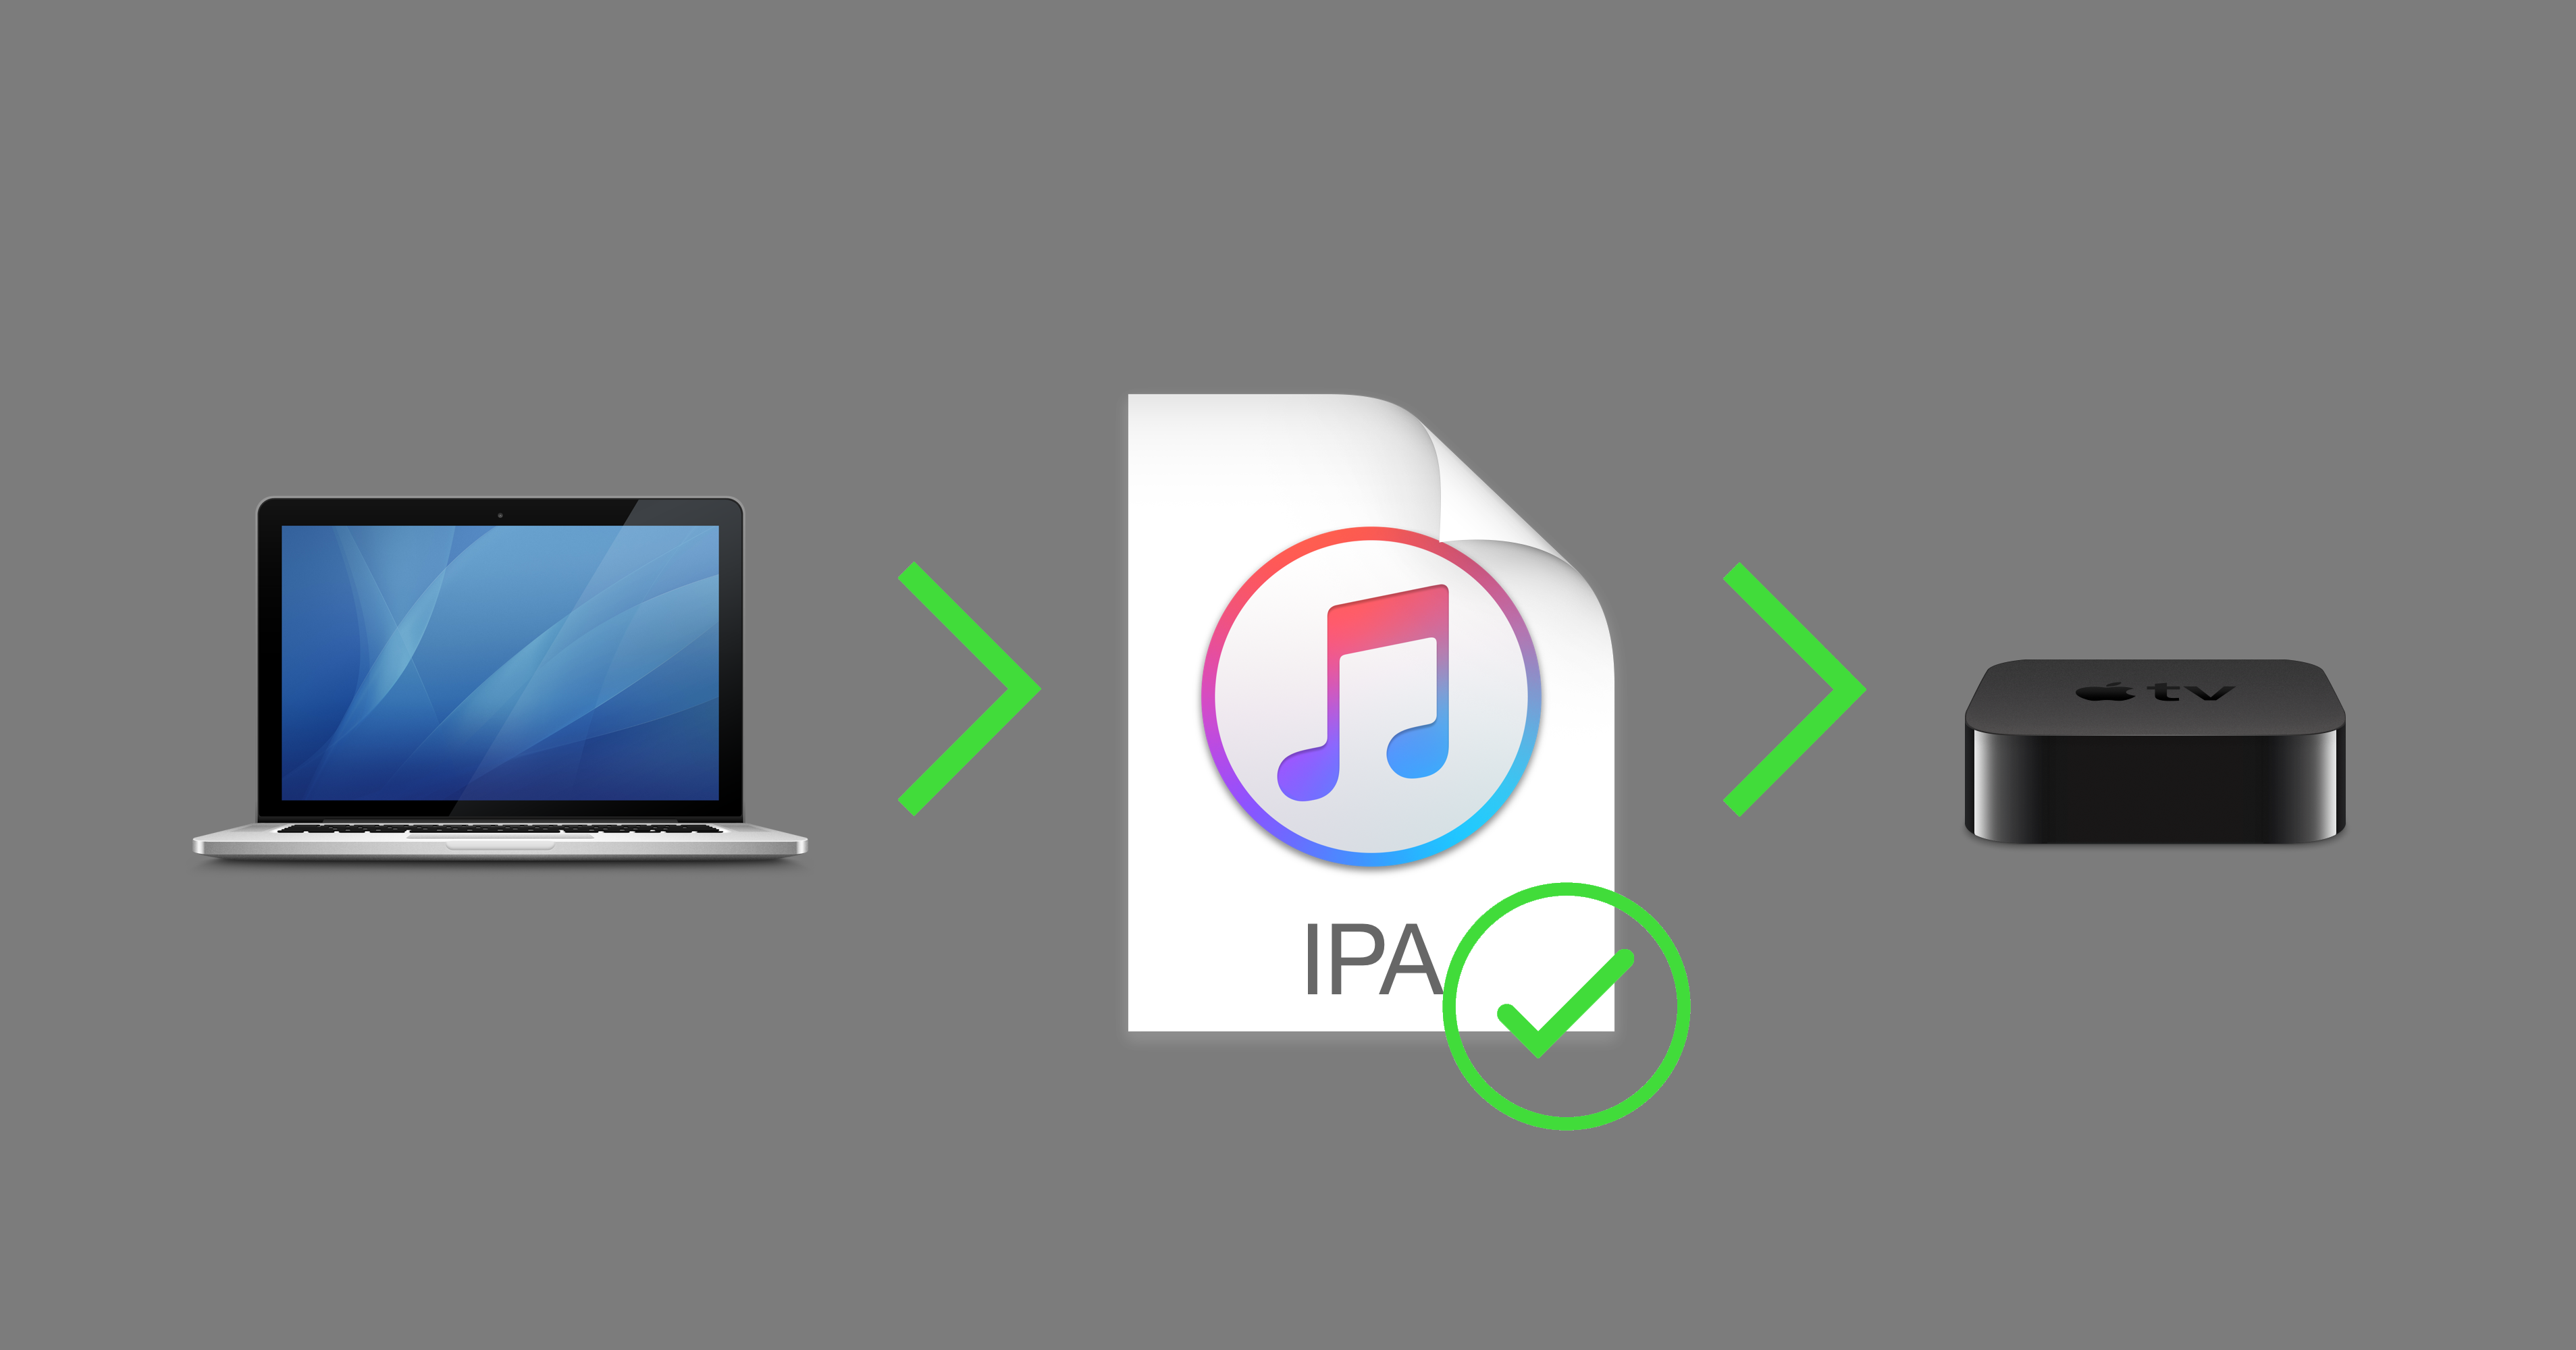
With no USB-C port to connect it to a computer, the Apple TV 4K falls firmly into the category of “irksome products which Apple doesn’t want you to mess with”. However, although it is easier to get your own apps onto its older brother the Apple TV 4, it’s still possible to sign and sideload apps on the 4K.
The first thing to note is that if you are an Apple TV 4 user, you don’t need to do this. The process is pretty involved (at least the first time through), and though it will work perfectly well on the Apple TV 4, there is simply no point when you can just use Cydia Impactor in a fraction of the time. To do so, follow Steps 1-6 of our other guide, replacing any references to LiberTV with your chosen app to sideload.
Apple TV 4K users, read on.
Prerequisites
The following prerequisite steps only have to be performed once. Once you’re all set up you’ll never need to repeat them. If you’ve followed these steps before and sideloaded an app already you can jump ahead to How to sign an app.
Before beginning, you must have:
1) A Mac computer, a Hackintosh, or a computer running macOS in a virtual machine.
2) Xcode, which you can download free from the Mac App Store.
3) The iOS App Signer application, available free from the official website.
4) Registered your Apple ID as a free developer account, which you can do very quickly on the Apple Developer portal.
5) Added your Apple ID in Xcode’s Preferences, ready to sign apps with.
6) Paired your computer with your Apple TV 4K so you can connect to it in Xcode. This is easily done by following Apple’s guide on the topic.
How to sign an app
If you know your app is signed already and you just want to sideload it to your Apple TV 4K, you can skip ahead to How to sideload an app. Examples of this scenario include saved apps which you’ve previously signed with iOS App Signer and just need to push over to your device again, and apps pre-signed by someone else with a valid certificate that you wish to use.
If you don’t know what that means, or don’t know for sure that your app is signed, you should assume the app is not signed, and follow the instructions in this section.
The first step will be to create a certificate and provisioning profile to sign the app with. Readers with a paid developer account can create these on the Apple developer site, under Certificates, Identifiers & Profiles. However, this is fiddly, and readers with a free developer account can’t do it all. For that reason, I recommend using the following method, which I find much easier:
1) Launch Xcode.
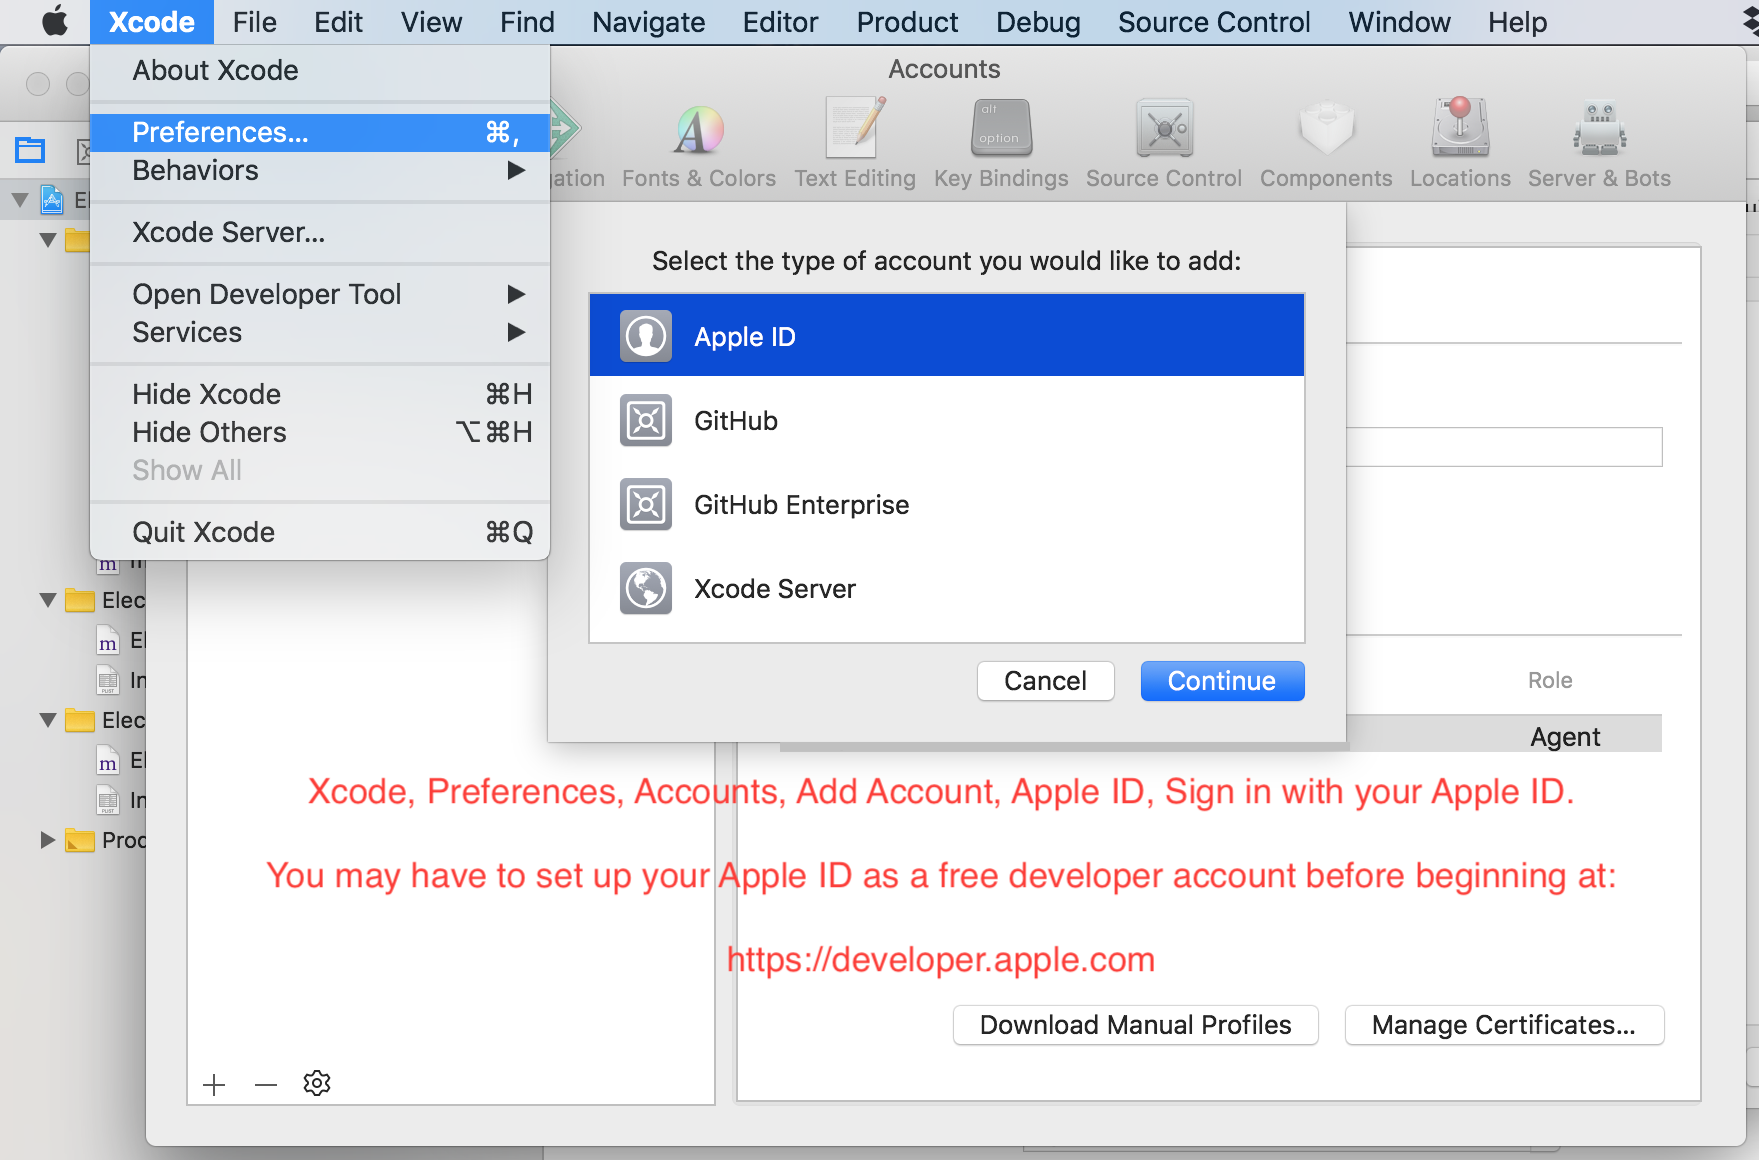
Under Xcode, Preferences, Accounts, check your Apple ID is added. This is to sign our apps with. If it isn’t, hit + to add an account, select Apple ID, and then sign in.
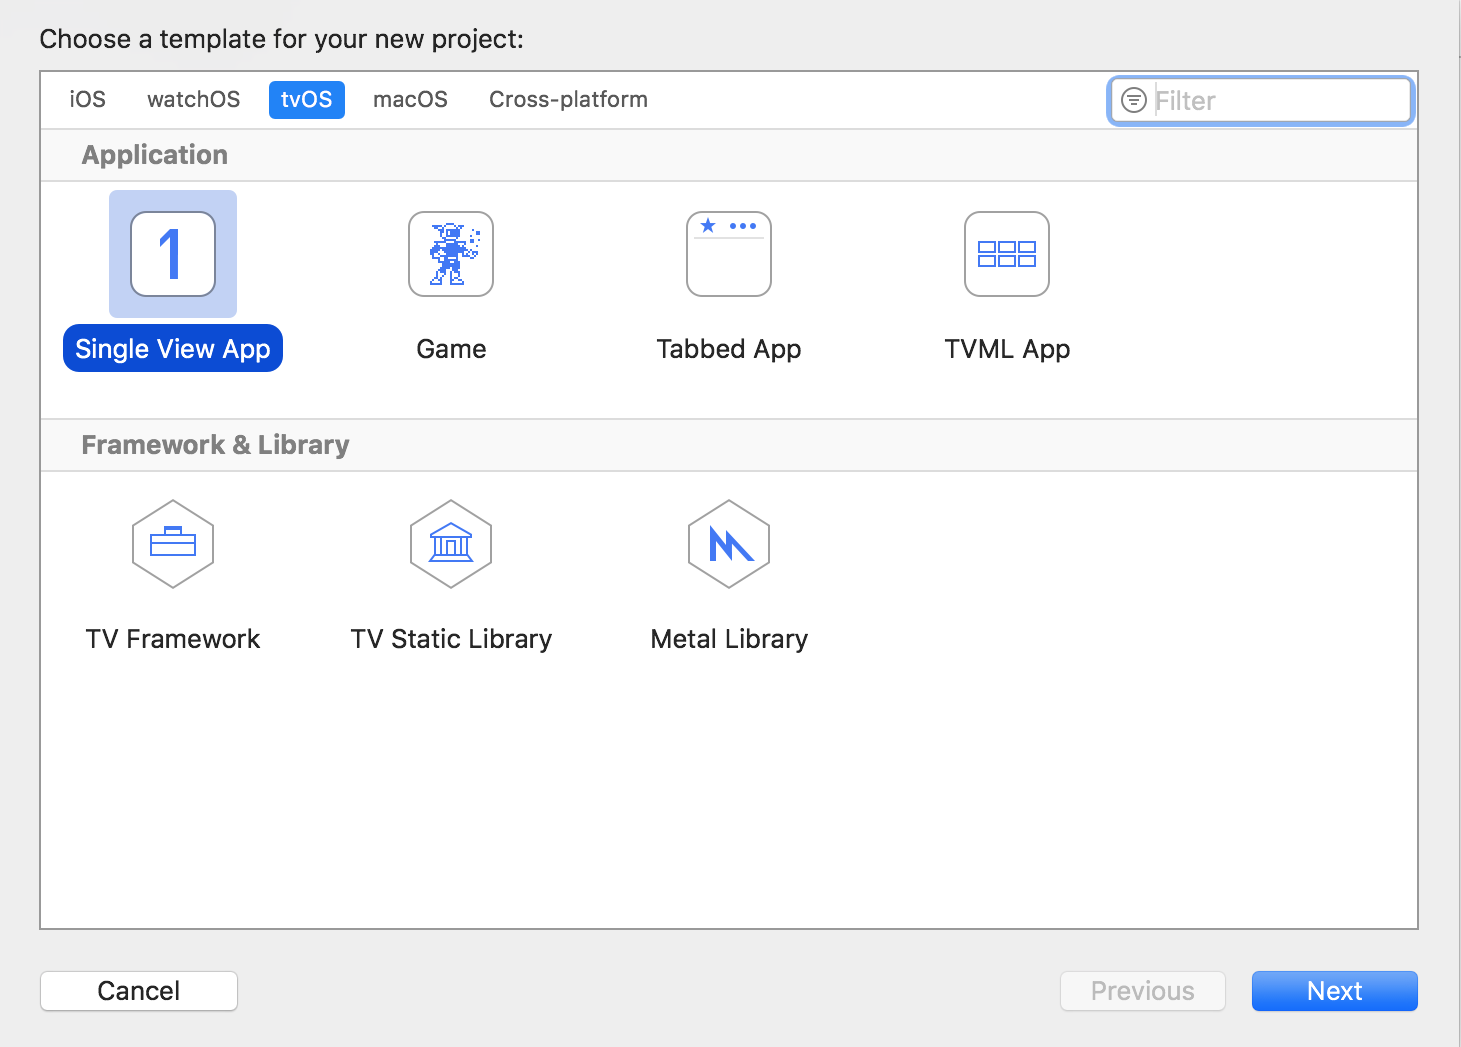
2) Now, in the menu bar select File, New Project, tvOS, Single View App.
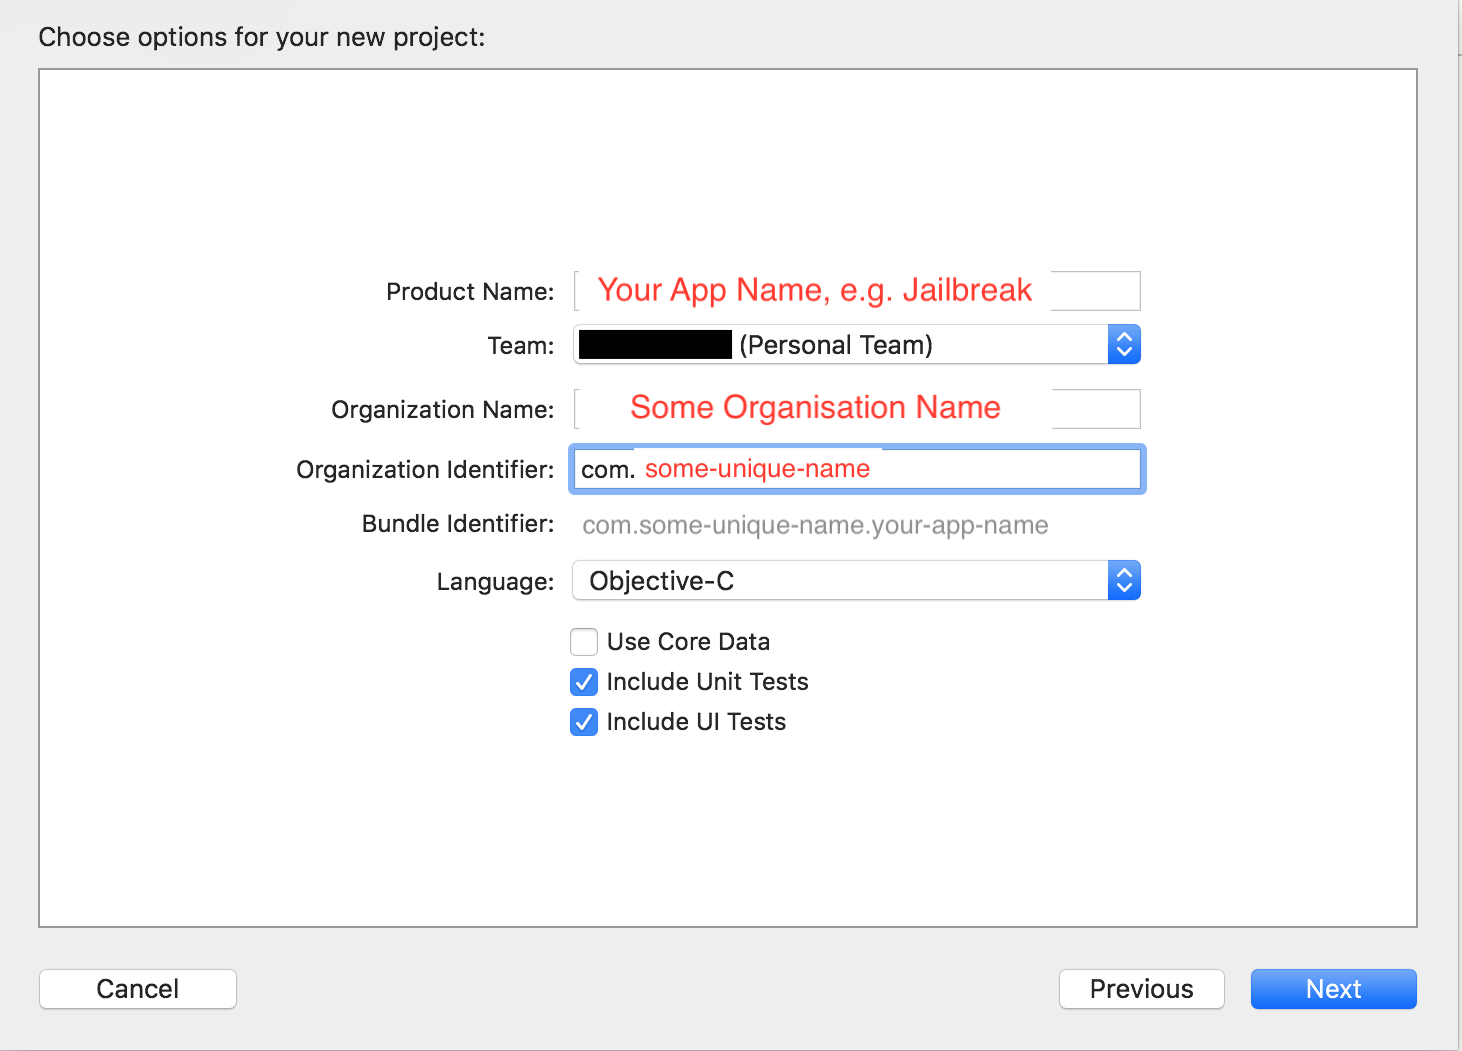
3) Now enter the project details. The Product Name should normally be the name of the app you want to sideload, for example Kodi. The Organisation Name could be literally anything. The Organisation Identifier is normally com. followed by some personal string you can use for all your apps, for example com.idownloadblog.
A Bundle Identifier will be generated automatically from those two fields. In the example I gave above, my bundle identifier would be com.idownloadblog.kodi. Yours will be different. The Team should be the Apple ID you added in Step 1) above.
4) Once the project is open, configure it as shown below. Make sure to select your specific Apple TV 4K unit in the top-left, not a generic one. It must be connected to your computer via the same Wi-Fi network to do this.
The Identity fields should be populated automatically with the information from Step 3). The Signing fields must have your Apple ID selected, and show no errors. Select your Apple TV 4K’s current firmware version under Deployment Target.
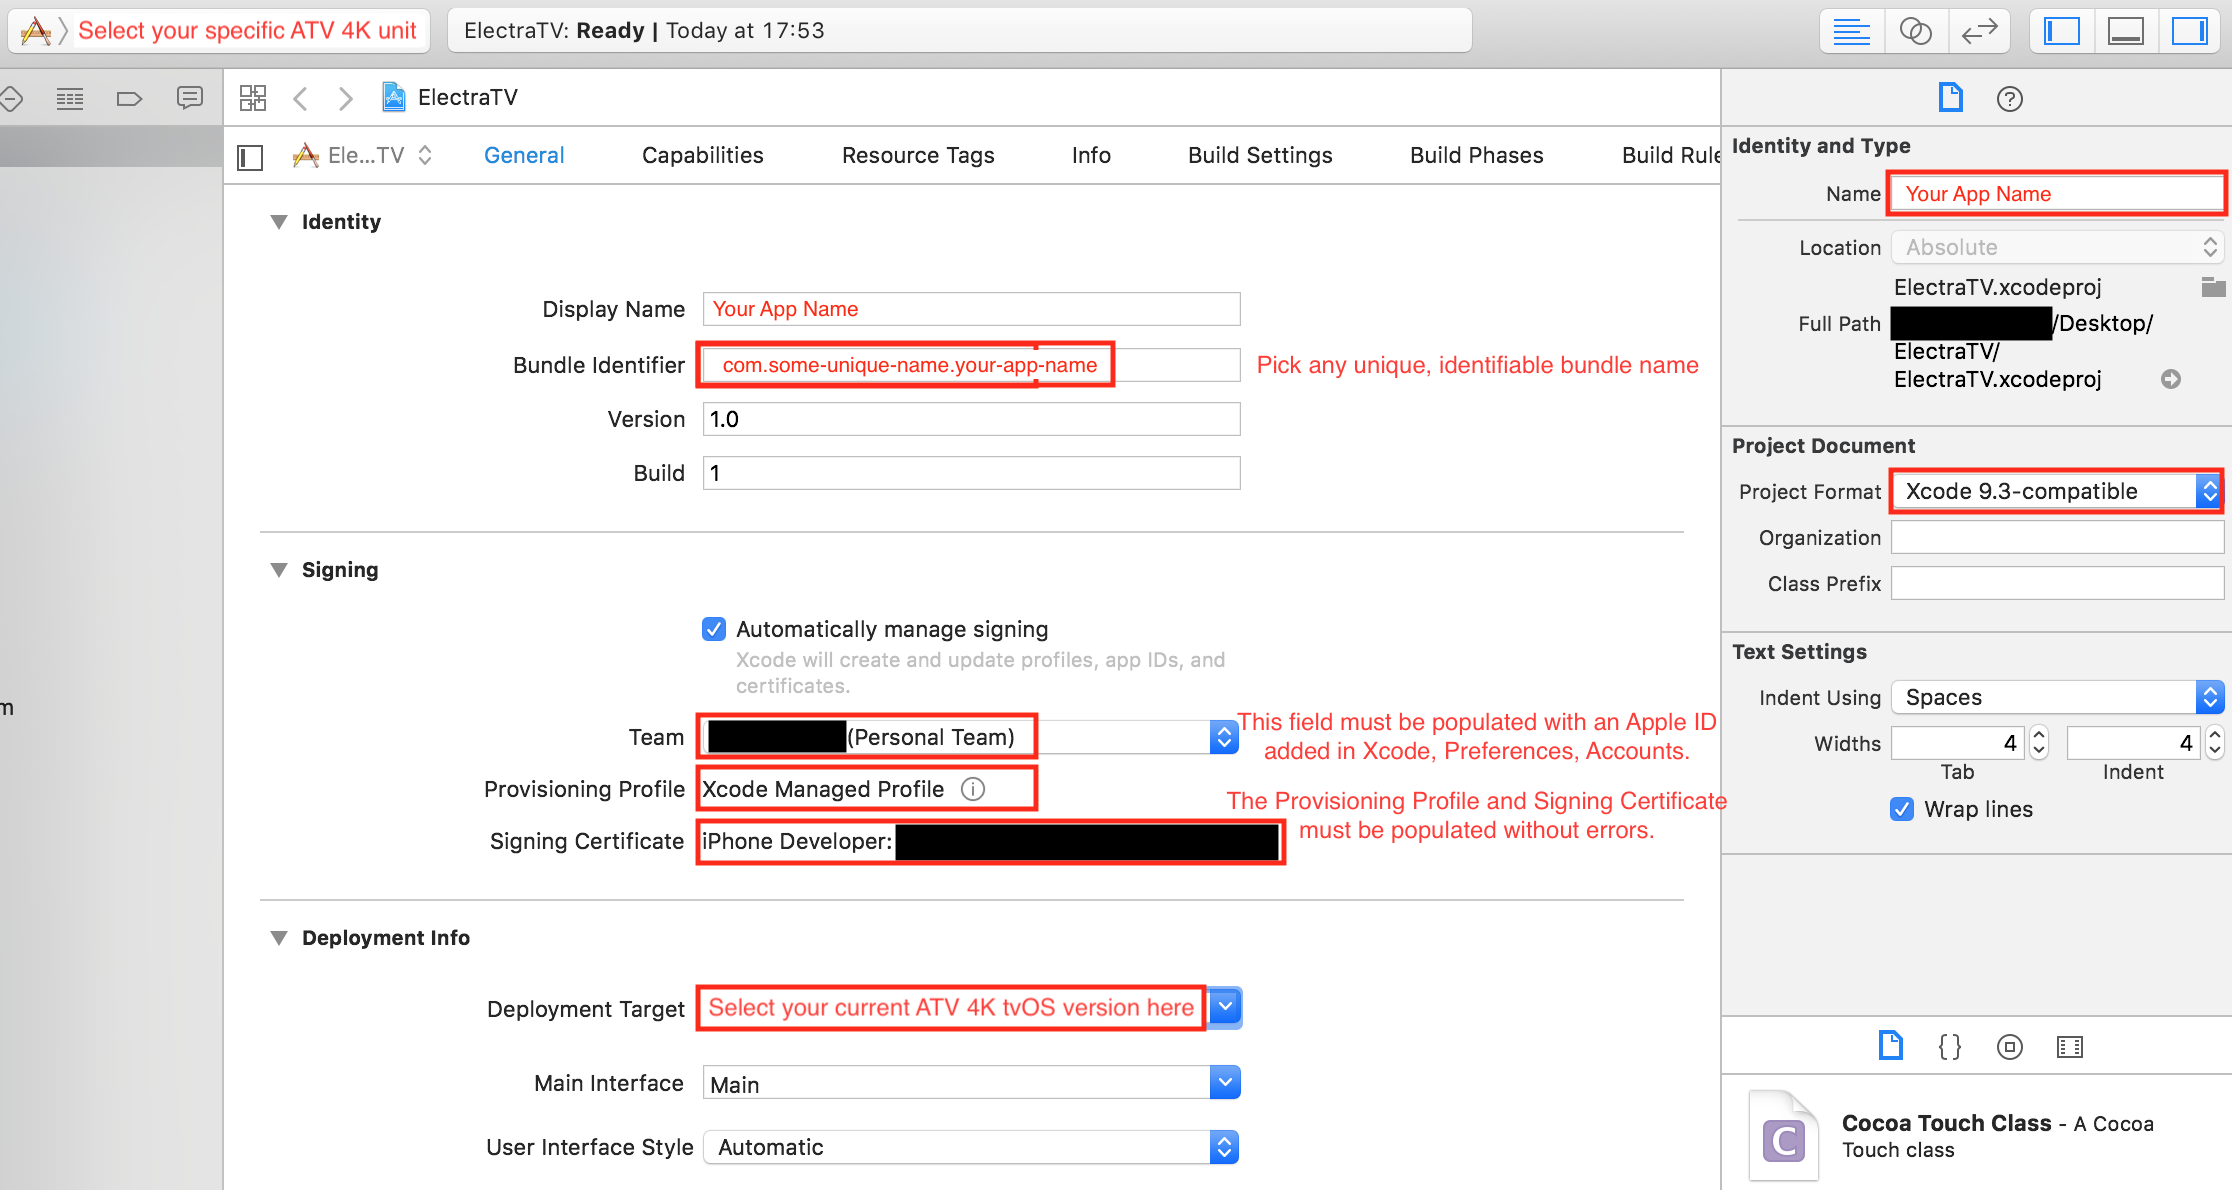
As you do this Xcode should create a provisioning profile and certificate automatically for your app/device, which you can see listed in the Signing section above.
You may now quit Xcode.
5) Launch iOS App Signer. Drag the app you want to sign into the Input File field.
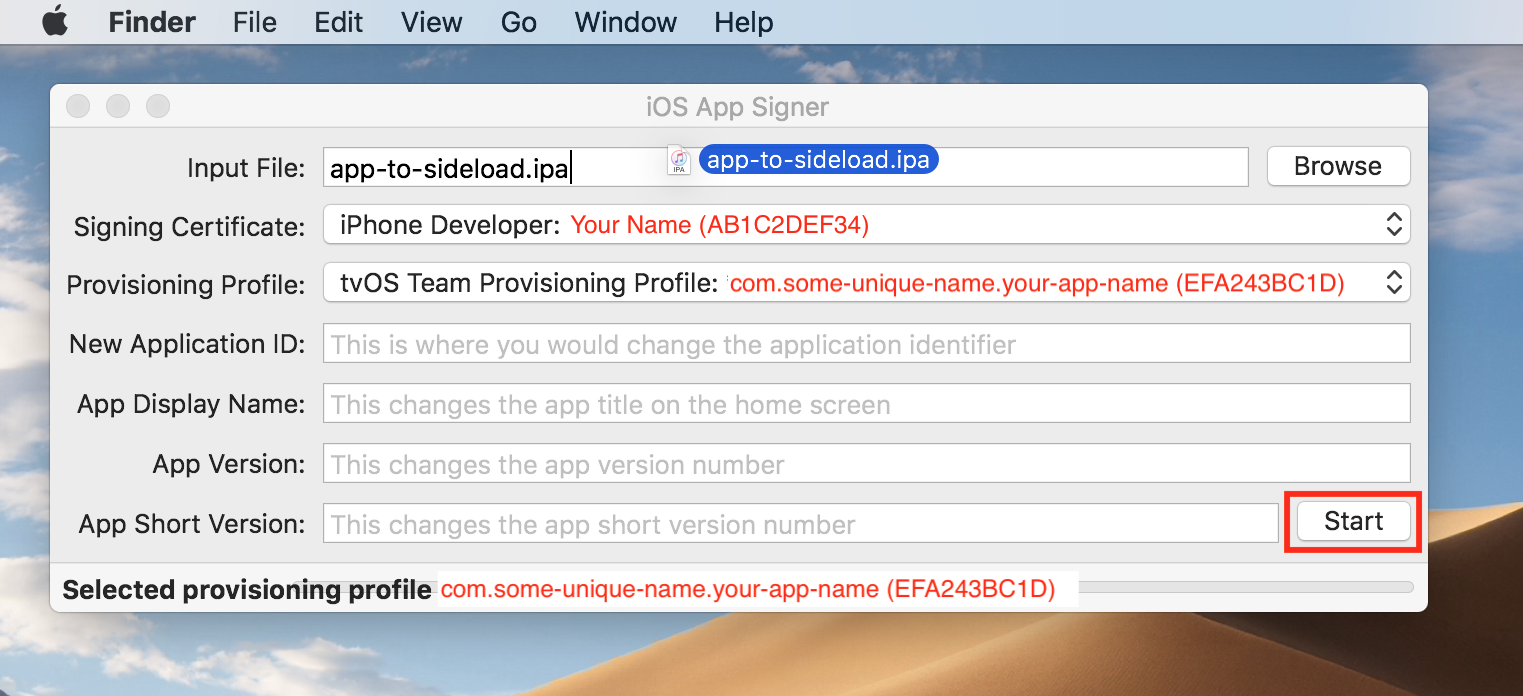
Under Signing Certificate, select the Apple ID which you use in Xcode (from Step 1)). For Provisioning Profile, select the profile which Xcode generated automatically for you. It will probably have the Bundle Identifier which was created with the Xcode project in Step 3), for example, com.idownloadblog.kodi.
The other fields can be ignored. Hit Start and save the now-signed app to your Desktop.
If you will need to sideload this app again in future, keep it saved on your computer. This will avoid repeating some of the guide next time.
6) Repeat Steps 2)-5) for any other app(s) which you want to sideload. Remember to change the details in the Xcode project and iOS App Signer each time, to match the app, Apple ID, and Apple TV unit you are using.
You are now ready to sideload the app(s) to your Apple TV 4K.
How to sideload an app
1) Once you have your signed app(s) ready, launch Xcode, and select Window, Devices and Simulators from the menu bar.
Make sure your Apple TV 4K is connected and highlighted in the sidebar.

2) Click the + button to add an app. Select your signed app(s) from the Desktop (or wherever you saved them) to sideload them to your Apple TV 4K.
3) The app(s) should now appear on your Apple TV home screen. Quit Xcode, and enjoy your sideloaded apps on your Apple TV 4K.
Additional information
If you have a free Apple developer account (and aren’t jailbroken) you will have to sideload your app(s) again every 7 days. If you have a paid account, it/they will last for a year.
In future, skip the Prerequisites section. To sideload new unsigned apps, follow the sections How to sign an app and How to sideload an app again. To sideload previously signed apps which you’ve already created an Xcode project and signing certificate for, follow How to sideload an app only.
If you retain your signed app(s) at the end of Step 5) in the section How to sign an app, you can resign them easily using iOS App Signer. Just drop them in and use the Re-Sign only option, then push them across as detailed in How to sideload an app.
Whew! The process isn’t actually as bad as it looks; many steps can be skipped after the first time, and others become second nature.
Problems? Let me know if you’re stuck via the comments section and I’ll try to help out.