![]()
You’d be amazed how much of your Mac’s storage is wasted on the iTunes library. All those apps and media you have purchased and downloaded over the years pile and clog up your Mac’s precious storage.
But with one-terabyte external hard drives retailing for less than $60 on Amazon, there are no excuses not to spring for external storage to move that humongous iTunes library of yours on.
This post takes you step-by-step through the process of consolidating your iTunes library and moving it to an external drive in a way that will preserve your playlists, ratings and other interactions, so you won’t miss a beat.
About iTunes folder
Apps and media you purchase, along with any files imported to iTunes and all your interactions are kept in a special folder on your computer. To locate the iTunes folder on your Mac, choose Go → Home → Music → iTunes in the Finder menu.

To locate the iTunes folder on Windows, go here:
- Windows XP: \Documents and Settings\username\My Documents\My Music\
- Windows Vista: \Users\username\My Music\
- Windows 7 or 8: \Users\username\Music\
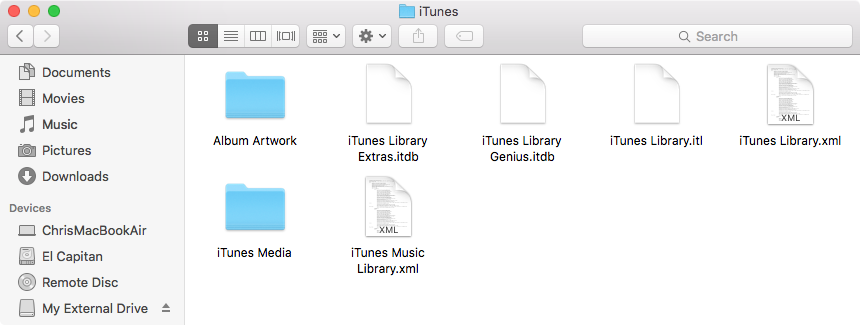
The iTunes folder is home to these items:
- iTunes Library.itl—This is the primary database that iTunes relies on heavily to organize your media, reference the files and store your playlists, play counts, ratings and other data. If deleted, it cannot be easily recreated from scratch.
- iTunes Library.xml—A version of the “iTunes Library.itl” file in a format that’s readable by third-party apps, allowing them to access your iTunes media. Should you accidentally delete this file, iTunes will recreate it on next launch.
- iTunes Library Genius.idb—This file stores data about your music library that the Genius feature uses and is created upon enabling Genius in iTunes.
- iTunes Library Extras.itdb—This file holds Gracenote CDDB information.
- Album Artwork folder—This folder is where iTunes saves album artwork that was downloaded automatically from the iTunes Store or added manually. It also holds a cache of album artwork that iTunes needs for the Cover Flow feature and regular album displays.
- iTunes Media folder—When you drop one or more files onto the iTunes window, iTunes adds media to your library and copies the original files to a sub-folder labeled “iTunes Media,” which by default lives inside the iTunes folder unless a custom location was set.
Here’s a snapshot of my iTunes folder in the Finder.
About that iTunes Media folder…
What’s inside iTunes Media folder?
You’ll find a handful of sub-folders in the iTunes Media folder:
- Audiobooks—Your purchased or imported audiobooks are stored here.
- Automatically Add to iTunes—Throw one or more files in this folder and iTunes will automatically import supported media into your library.
- Downloads—Temporary stores any unfinished downloads.
- Mobile Applications—Your iPhone, iPod touch and iPad apps are kept here.
- Movies—Imported or purchased movies go here.
- Music—Your imported or purchased songs and albums.
- Podcasts—Downloaded podcast episodes go here.
- Tones—iPhone ringtones created in iTunes are stored here.
- TV Shows—Imported or purchased TV shows are stored here.
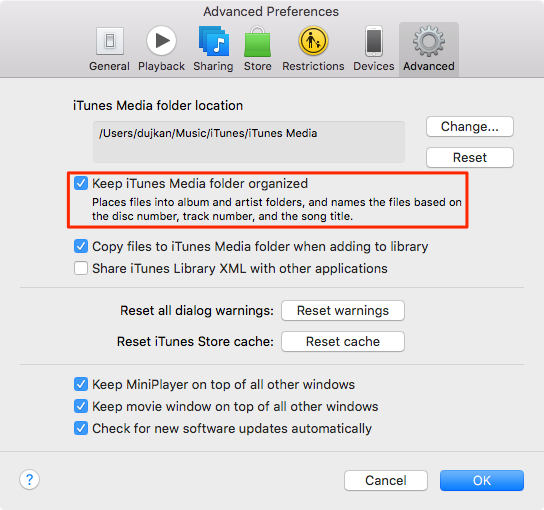
Should you elect to have your iTunes Media folder organized, iTunes will place song files into album and artist folders. Individual files will adopt the file name format based on the disc number, track number and the song title.
If you choose to prevent iTunes from copying files to the iTunes Media folder when adding items to your library, copying the entire iTunes folder to an external drive won’t copy the referenced media files that live outside of the iTunes folder.
That’s where iTunes’ library consolidation feature comes to the rescue.
Why you should consolidate your library
Consolidation ensures everything in your library is stored in one place. You’re recommended to consolidate your library before moving the iTunes folder to external storage. Doing so will copy media files that live in other locations into the iTunes Media folder.
If “Copy files to iTunes Media folder when adding to library” is selected, dropping files on iTunes will place copies of their originals in the iTunes Media folder.
In other words, consolidating an iTunes library ensures that every referenced media file gets copied when you drag the iTunes folder onto an external drive. This feature is detailed in the main tutorial, which begins right below.
How to move iTunes folder to an external drive
Step 1: Launch iTunes on your computer.
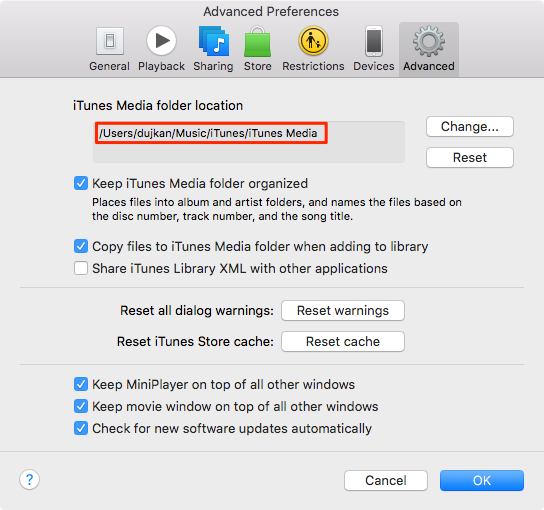
Step 2: Open iTunes → Preferences (Mac) or Edit → Preferences (Windows).
Step 3: Select the Advanced tab in the iTunes Preferences window.
Step 4: Tick the box next to the option labeled “Copy files to iTunes Media folder when adding to library”.
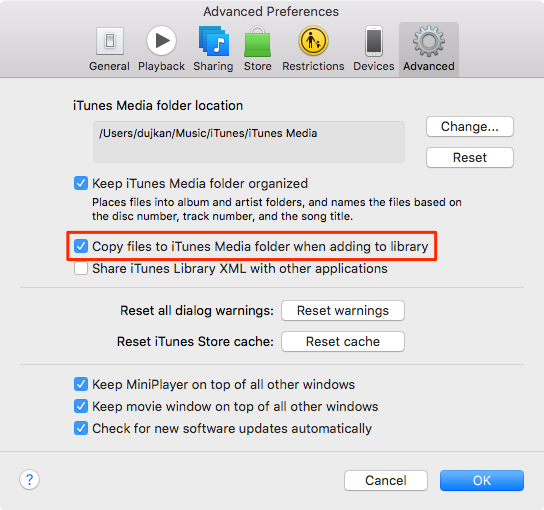
Step 5: Click OK to close the iTunes Preferences window.
Step 6: Choose File → Library → Organize Library in the menus.
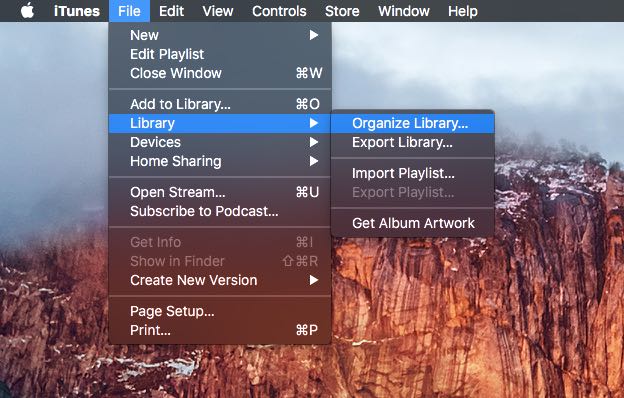
Step 7: Select the option to Consolidate files.
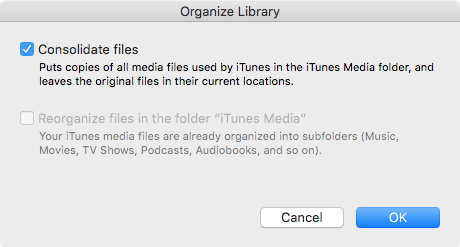
This “puts copies of all media files used by iTunes in the iTunes Media folder and leaves the original files in their current locations,” reads the feature’s description.
Step 8: Click OK to continue.
iTunes shall begin copying media files from their original locations to the iTunes Media folder. iTunes won’t remove or delete the originals from their original locations nor will it create duplicates of files that are already present in the iTunes Media folder.
Step 9: Quit iTunes.
Step 10: In the Finder, open the iTunes folder on your Mac.
If you’re unsure where your iTunes folder is, launch iTunes, access Preferences and on the Advanced tab look for the current iTunes folder location under the iTunes Media folder location section.
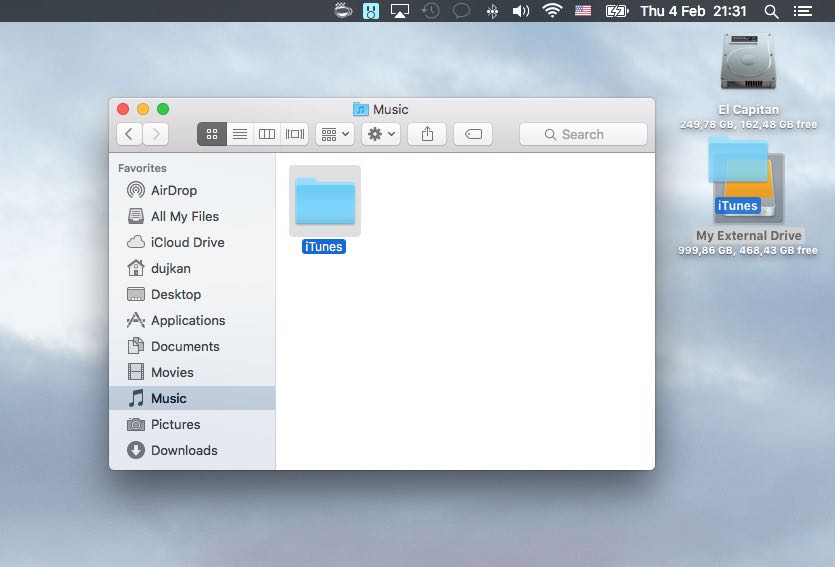
Step 11: Connect an external drive to your Mac and wait until it pops up on the desktop.
Step 12: Drag the iTunes folder from your Mac and drop it on the external drive on the desktop. Now’s the right time to fix yourself a cup of coffee because copying a multi-gigabyte iTunes library is going to take a while.
Step 13: When the transfer is complete, you need to point iTunes to the just-copied iTunes library on the external disk. To do so, open iTunes while holding down the Option (⌥) key (Mac) or Shift (⇧) key (Windows).
Step 14: A dialog will pop up, requesting that you choose your iTunes library.
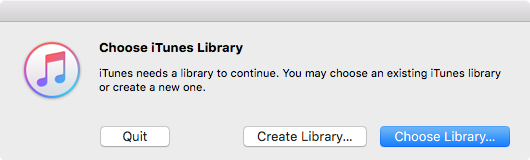
Click the Choose Library button.
Step 15: In the Finder’s sidebar under the Devices heading locate the external drive and navigate to the iTunes folder you just moved to the external drive.
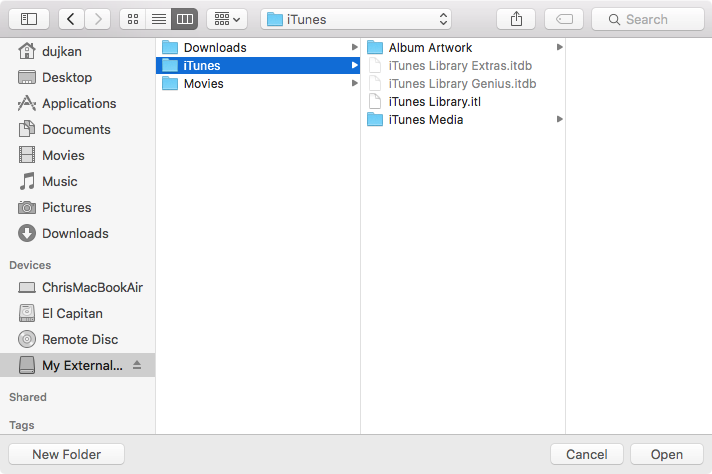
Step 16: Click Open to continue.
iTunes will load and update the library file, if necessary, to reflect changed media file locations. From now on, launching iTunes will automatically load this library.
Tip: You can switch between different iTunes libraries at any time by holding down the Option (⌥) key (Mac) or Shift (⇧) key (Windows) when launching iTunes.
Step 17: As a precaution, verify that your library references files on the external drive, not the items on your Mac. The easiest way to do so entails highlighting any item in iTunes, like a song or an app, and bringing up the Info pane by hitting Command (⌘) – I.
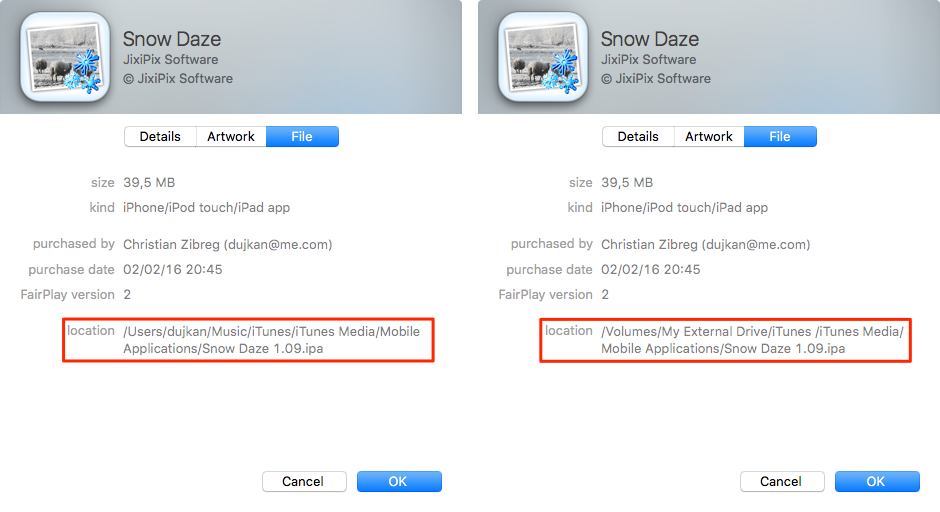
Location of the Snow Daze app before (left) and after I consolidated my library and copied the iTunes folder to external storage (right).
Now click the File tab and make sure the file path in the Location section points to the iTunes folder on the external drive, not to the old iTunes folder on your Mac.
Step 18: You can now free up storage by trashing the original iTunes folder on your Mac. Moreover, you can safely delete files added to iTunes when the option “Copy files to iTunes Media folder when adding to library” was disabled because the library is now consolidated and everything should live inside the iTunes folder.
Do not delete the original files until positively confirming that they’ve been moved to the iTunes Media folder on your external drive and backed up.
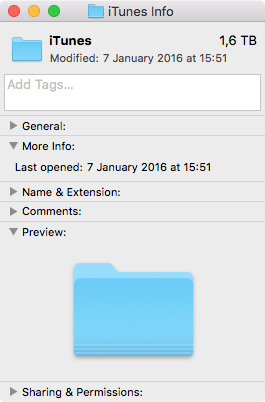
For those wondering, my iTunes folder currently weights in at a whopping 1.6 terabytes, taking up more than half the storage on my 3TB Time Capsule.
If you like this article, check out iDownloadBlog’s iTunes how-to archive.
Please consider sharing this tutorial on social media and submit ideas for future how-to coverage at tips@iDownloadBlog.com.