Have multiple voice recordings inside the iPhone Voice Memos app and wondering how to get them to your computer? In this guide, we show you six ways to transfer voice memos from iPhone to Mac or PC.
1. Sync Voice Recordings via iCloud
- From: iPhone, iPad, Mac
- To: iPhone, iPad, Mac
Thanks to iCloud, you just need to enable a couple of switches, and then your current and future voice memos will sync automatically among all your Apple devices.
Here’s how to sync and transfer voice memos from iPhone to Mac using iCloud:
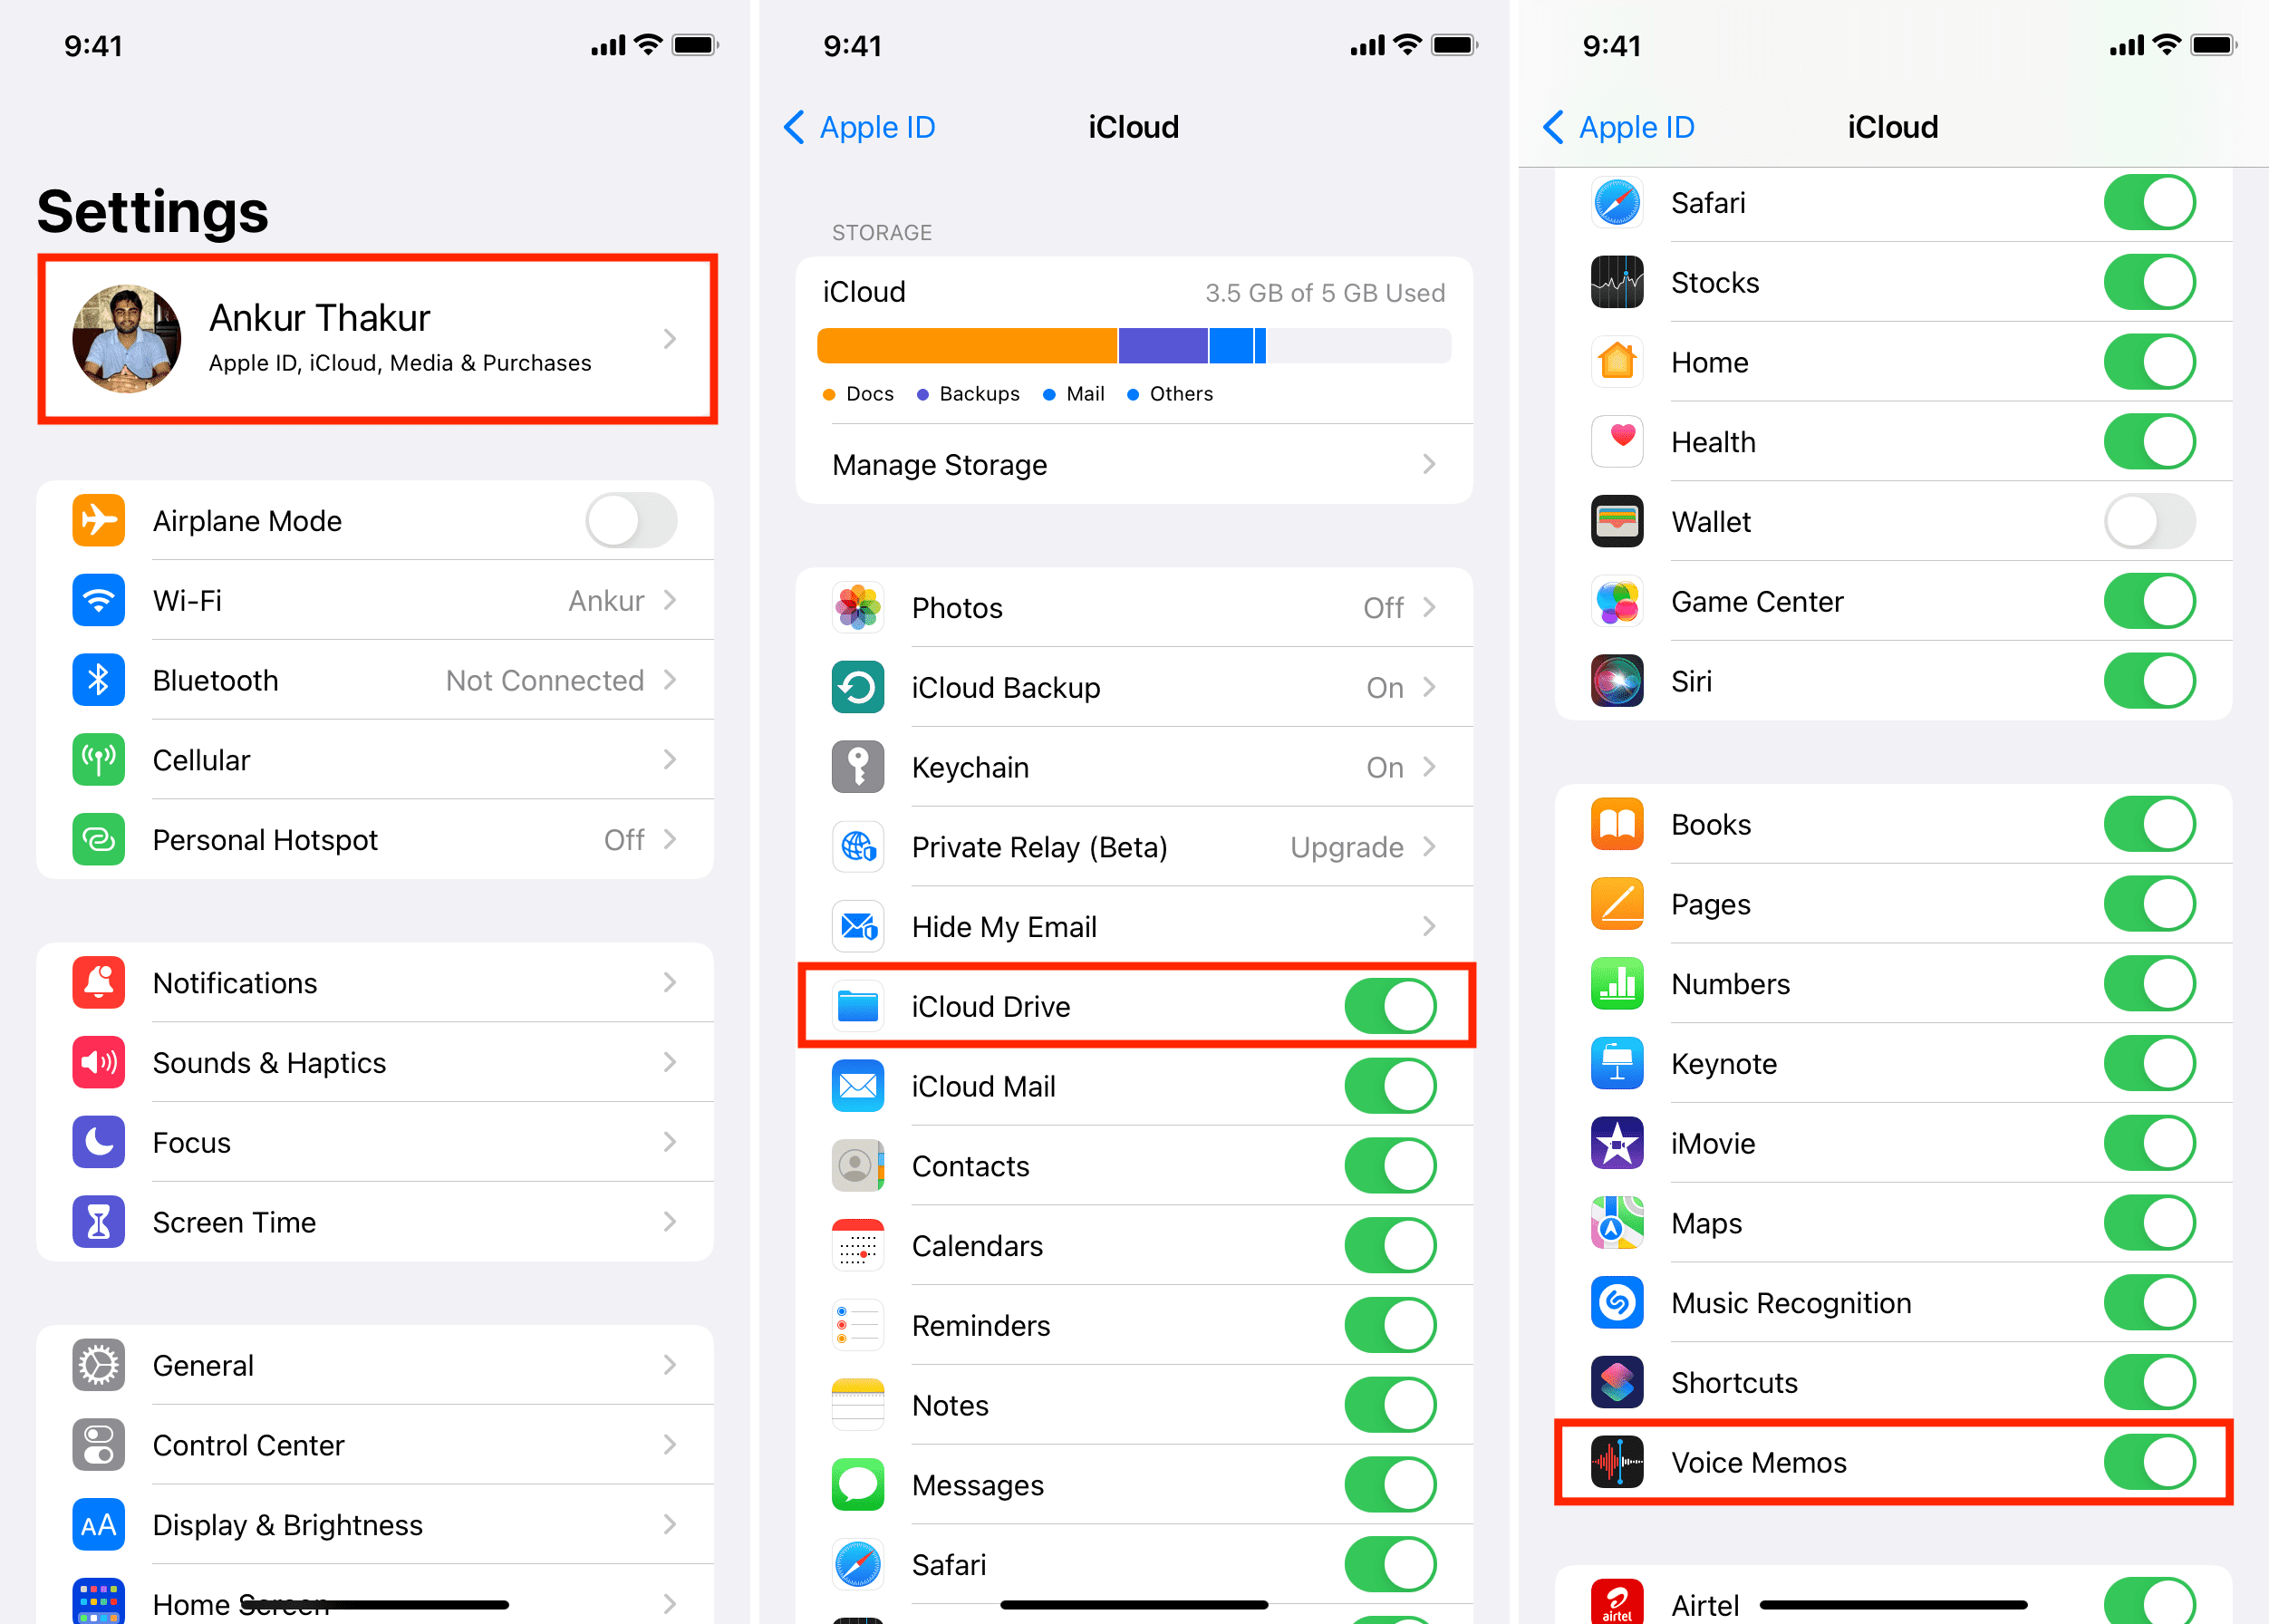
1) Open Settings on your iPhone and tap your name from the top.
2) Tap iCloud, and from the next screen, enable iCloud Drive and Voice Memos.
3) Open the Voice Memos app on your Mac running macOS Mojave or later.
4) You should see an iCloud Syncing popup. Click Enable.
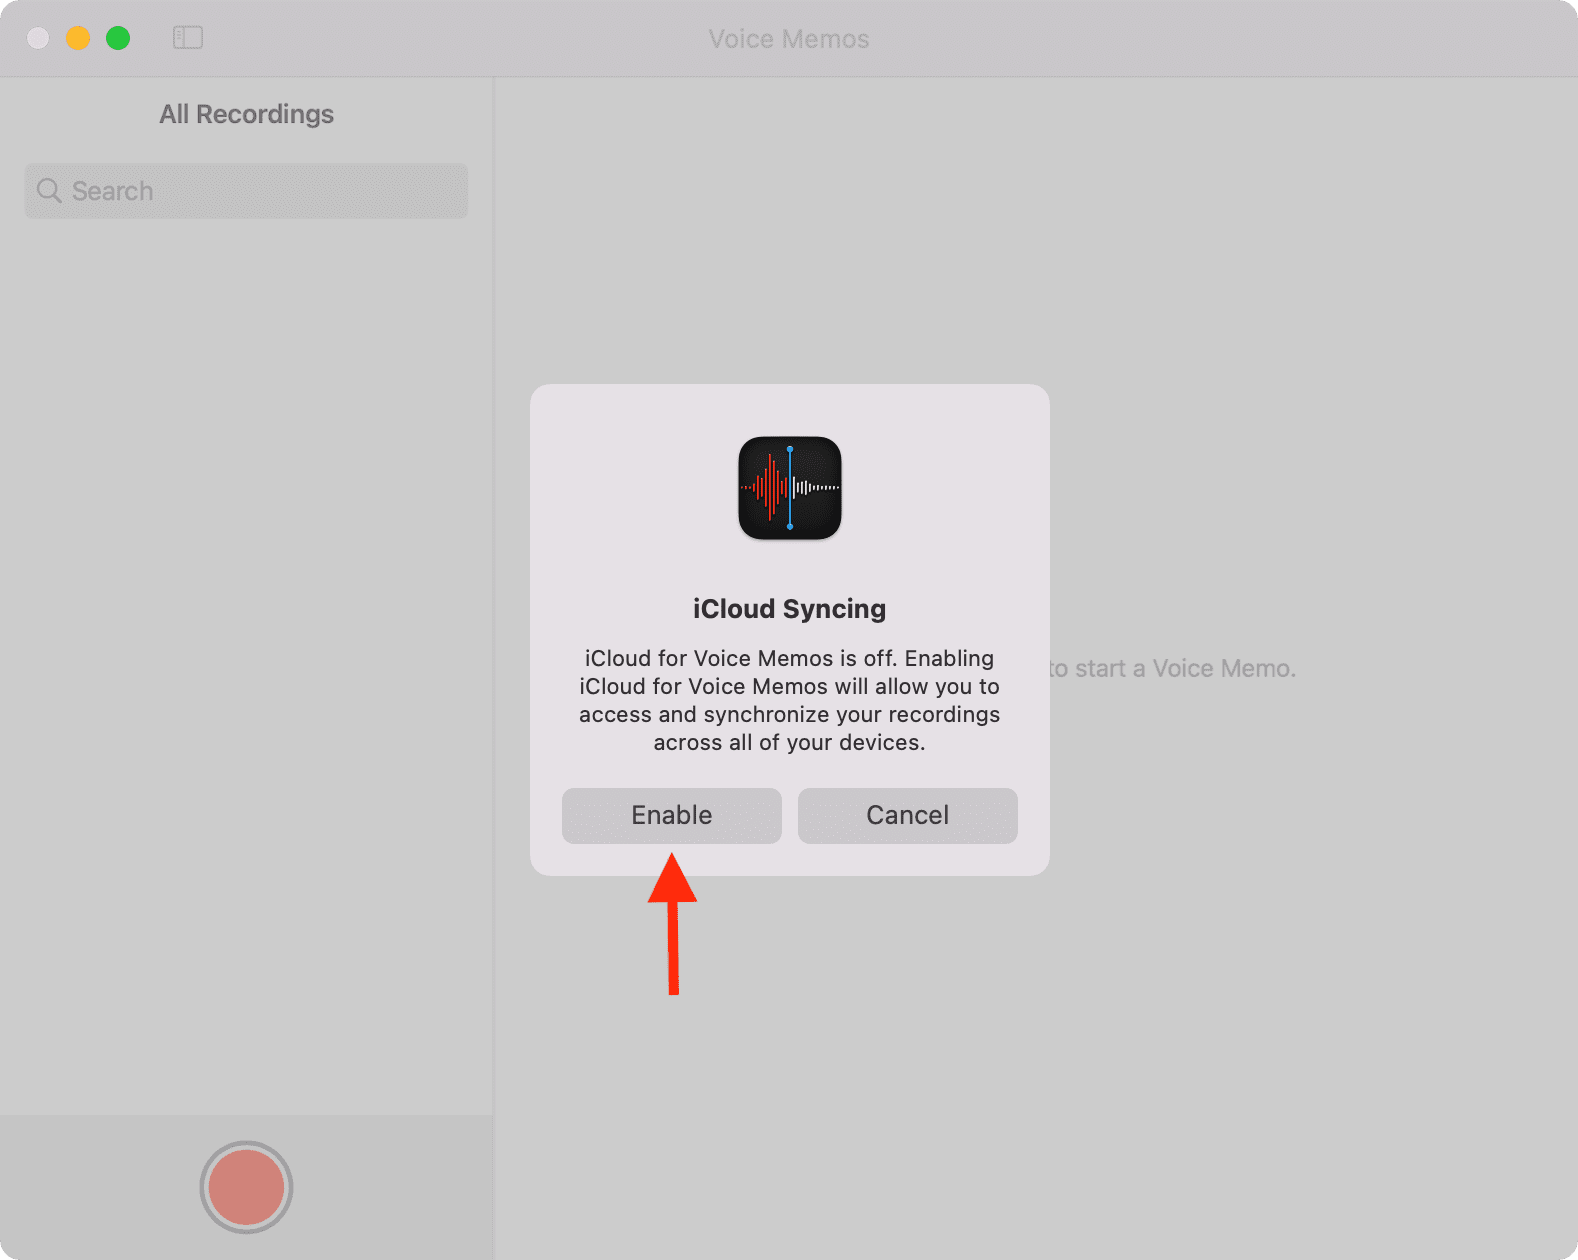
Now, your voice memos from your iPhone will sync to your Mac via iCloud.
Once they are downloaded to your Mac, you can drag the voice recording from the Voice Memos app to your Mac’s desktop or any Finder folder to get the file.
2. Transfer Voice Memos via AirDrop
- From: iPhone, iPad, Mac
- To: iPhone, iPad, Mac
AirDrop makes transferring your voice notes from iPhone to Mac effortless.
First, enable Wi-Fi and Bluetooth on your Mac. Next, open a Finder window > AirDrop and next to Allow me to be discovered by, make sure it says Everyone or Contacts Only. Once that’s done, you can transfer your recordings from iPhone to Mac:
1) Open the Voice Memos app on your iPhone or iPad.
2) From the All Recordings screen, tap Edit.
3) Select one or more voice memos and tap the share icon.
4) Tap AirDrop and choose your Mac.
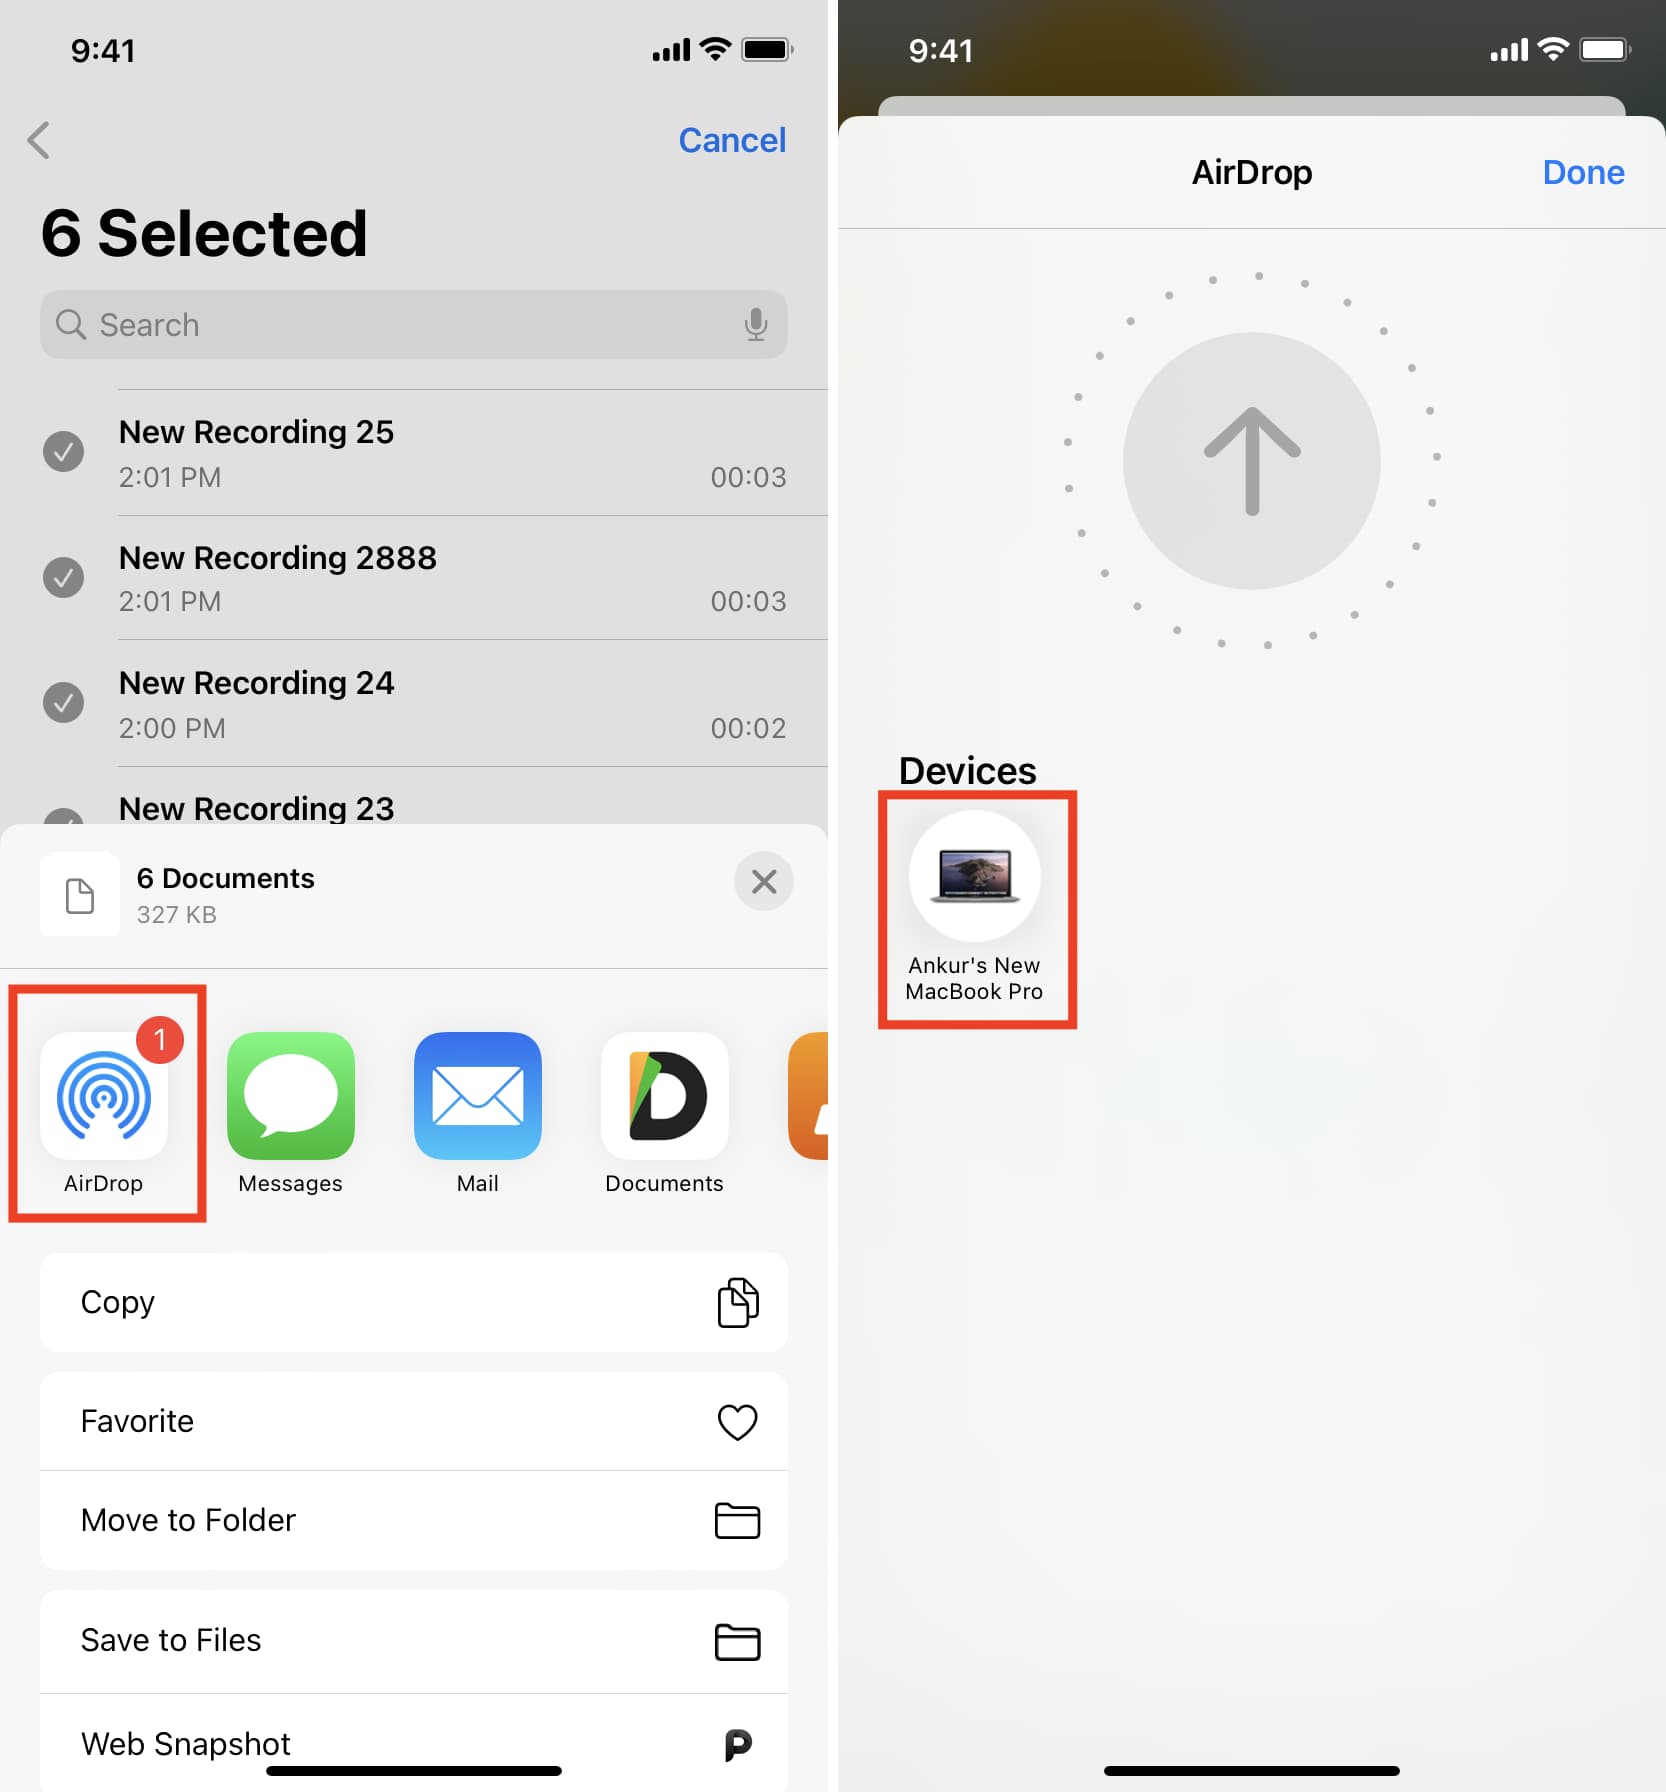
All the voice memos will save as .m4a files to your Mac’s Downloads folders. From here, you can open them in the Music app or other apps like QuickTime and VLC. To open them in Voice Memos, drag the file from the Downloads folder onto the Voice Memos app.
Related: AirDrop not working? Try these troubleshooting tips
3. Email the voice memos
- From: iPhone, iPad, Mac
- To: Mac, PC, Android, etc.
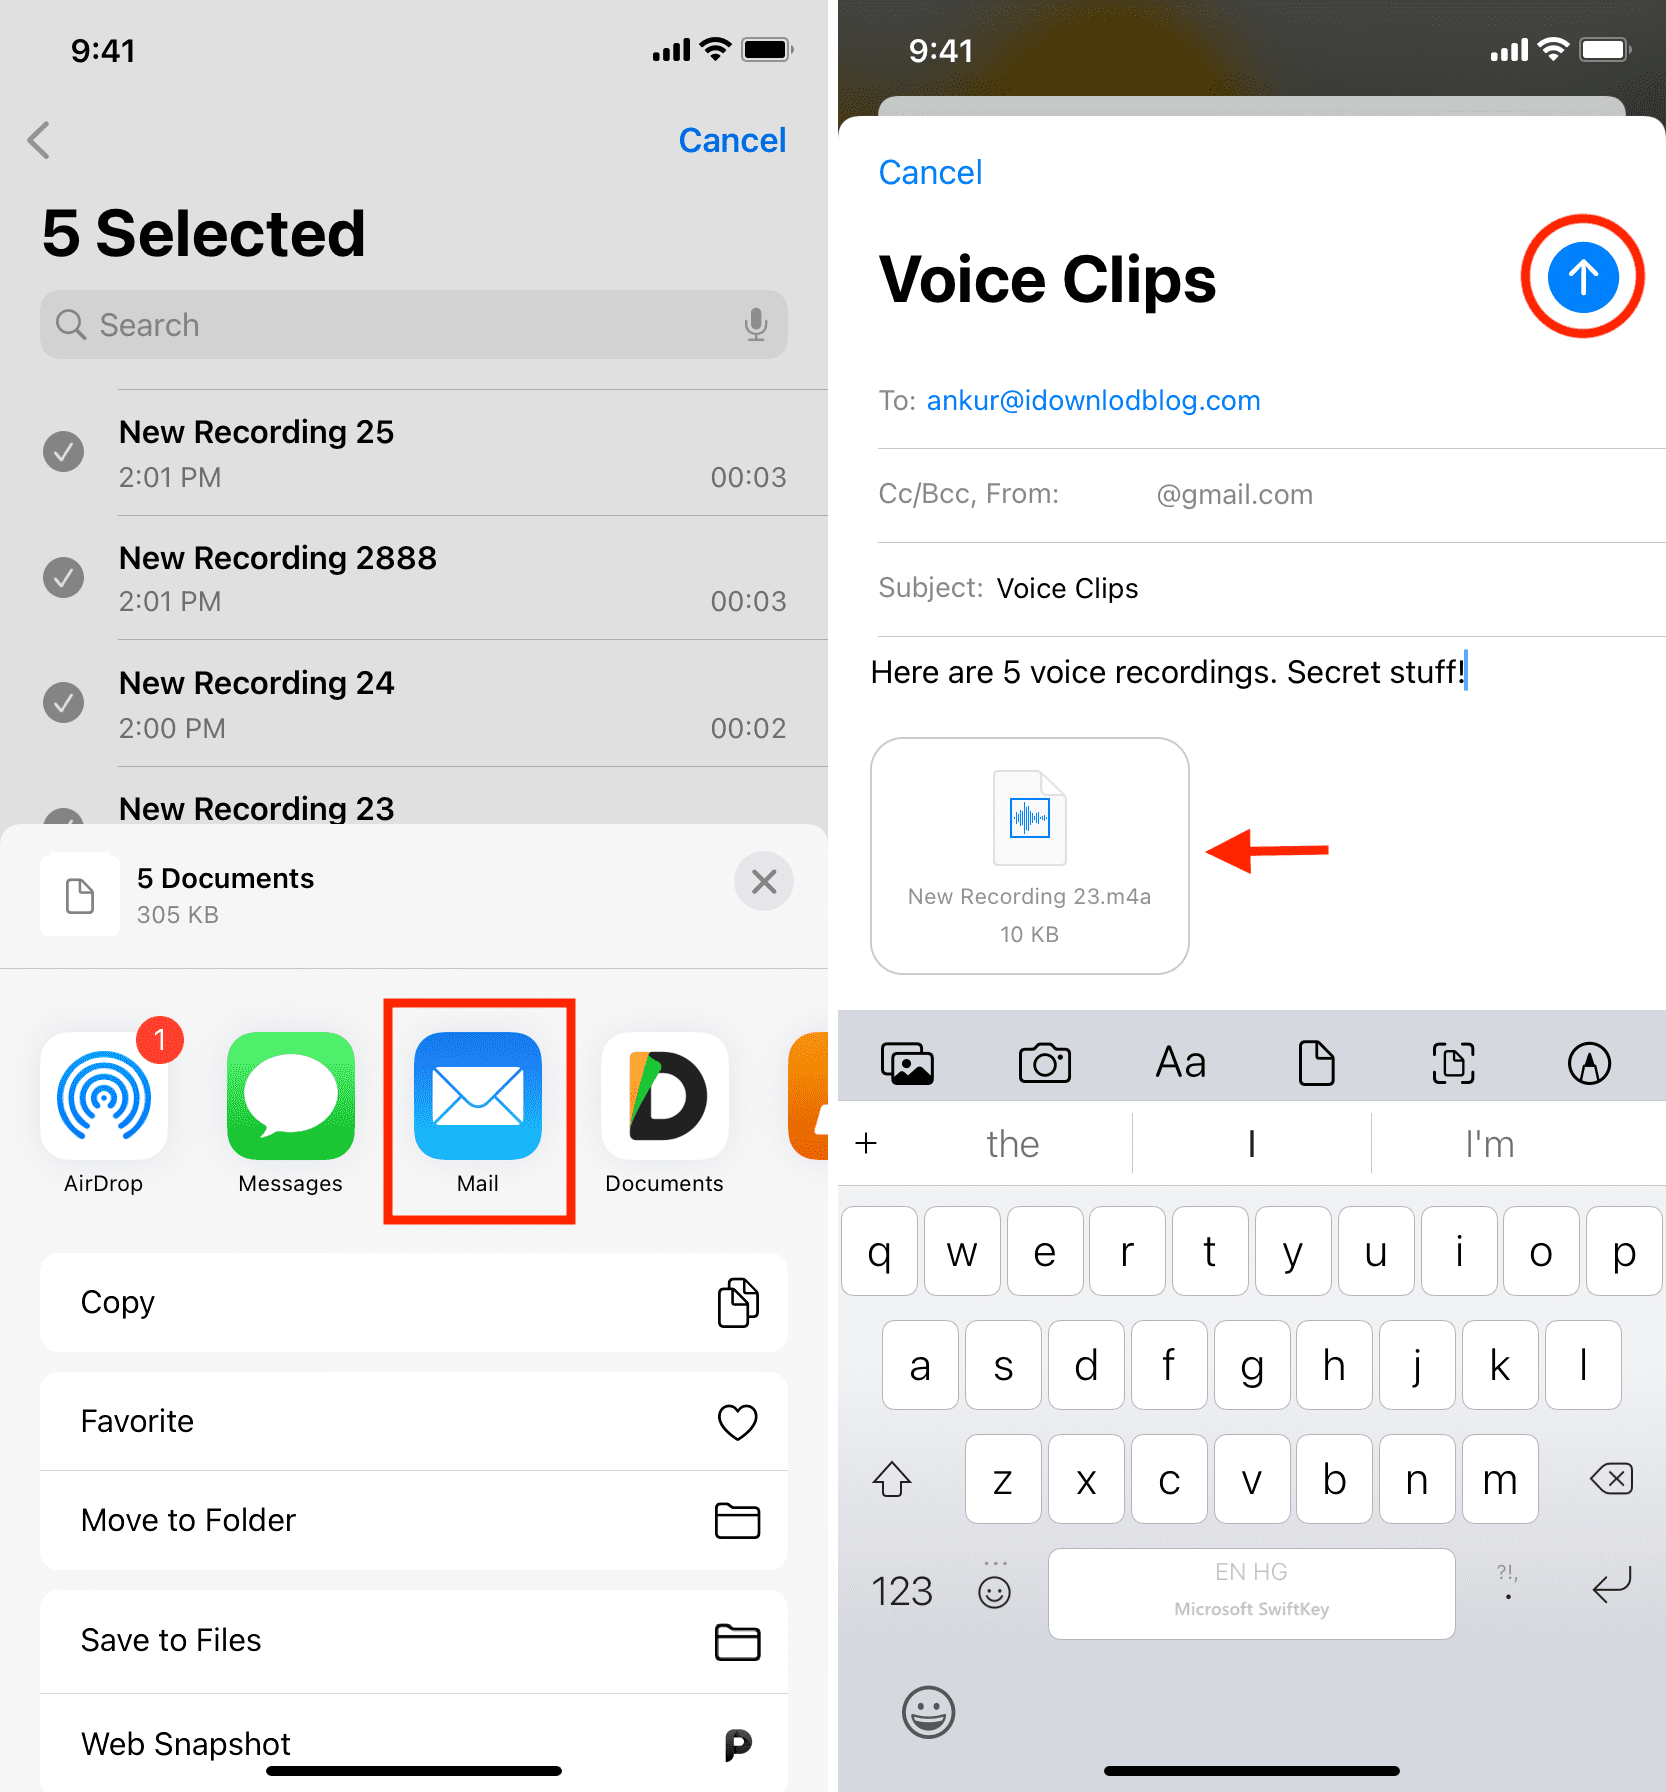
The basics are the same as the AirDrop method. Start by selecting the voice recordings and tap the share icon. Now choose the email app from the iOS Share Sheet and email the voice recordings to yourself or an email account you use on your other devices.
Tip: If there are several voice recordings, you can save them to the Files app and then make them into a single ZIP file. After that, send the ZIP file via email.
Depending on the voice memos’ file size, sending the email may take a while. Once that’s done, open the email on your computer and download the voice notes.
Related: What is Mail Drop and how to use it on iPhone, Mac, and PC
4. Transfer Voice Memos using the Files app
- From: iPhone, iPad
- To: Mac and PC via a browser
The Files app lets you save any kind of media on your iPhone. You can save the voice memos to the iCloud Drive section of the inbuilt Files app from where they will upload to iCloud Drive. After that, open iCloud Drive on Mac or PC to download the voice recordings.
Here’s how to transfer voice recordings from iPhone to a computer using the Files app:
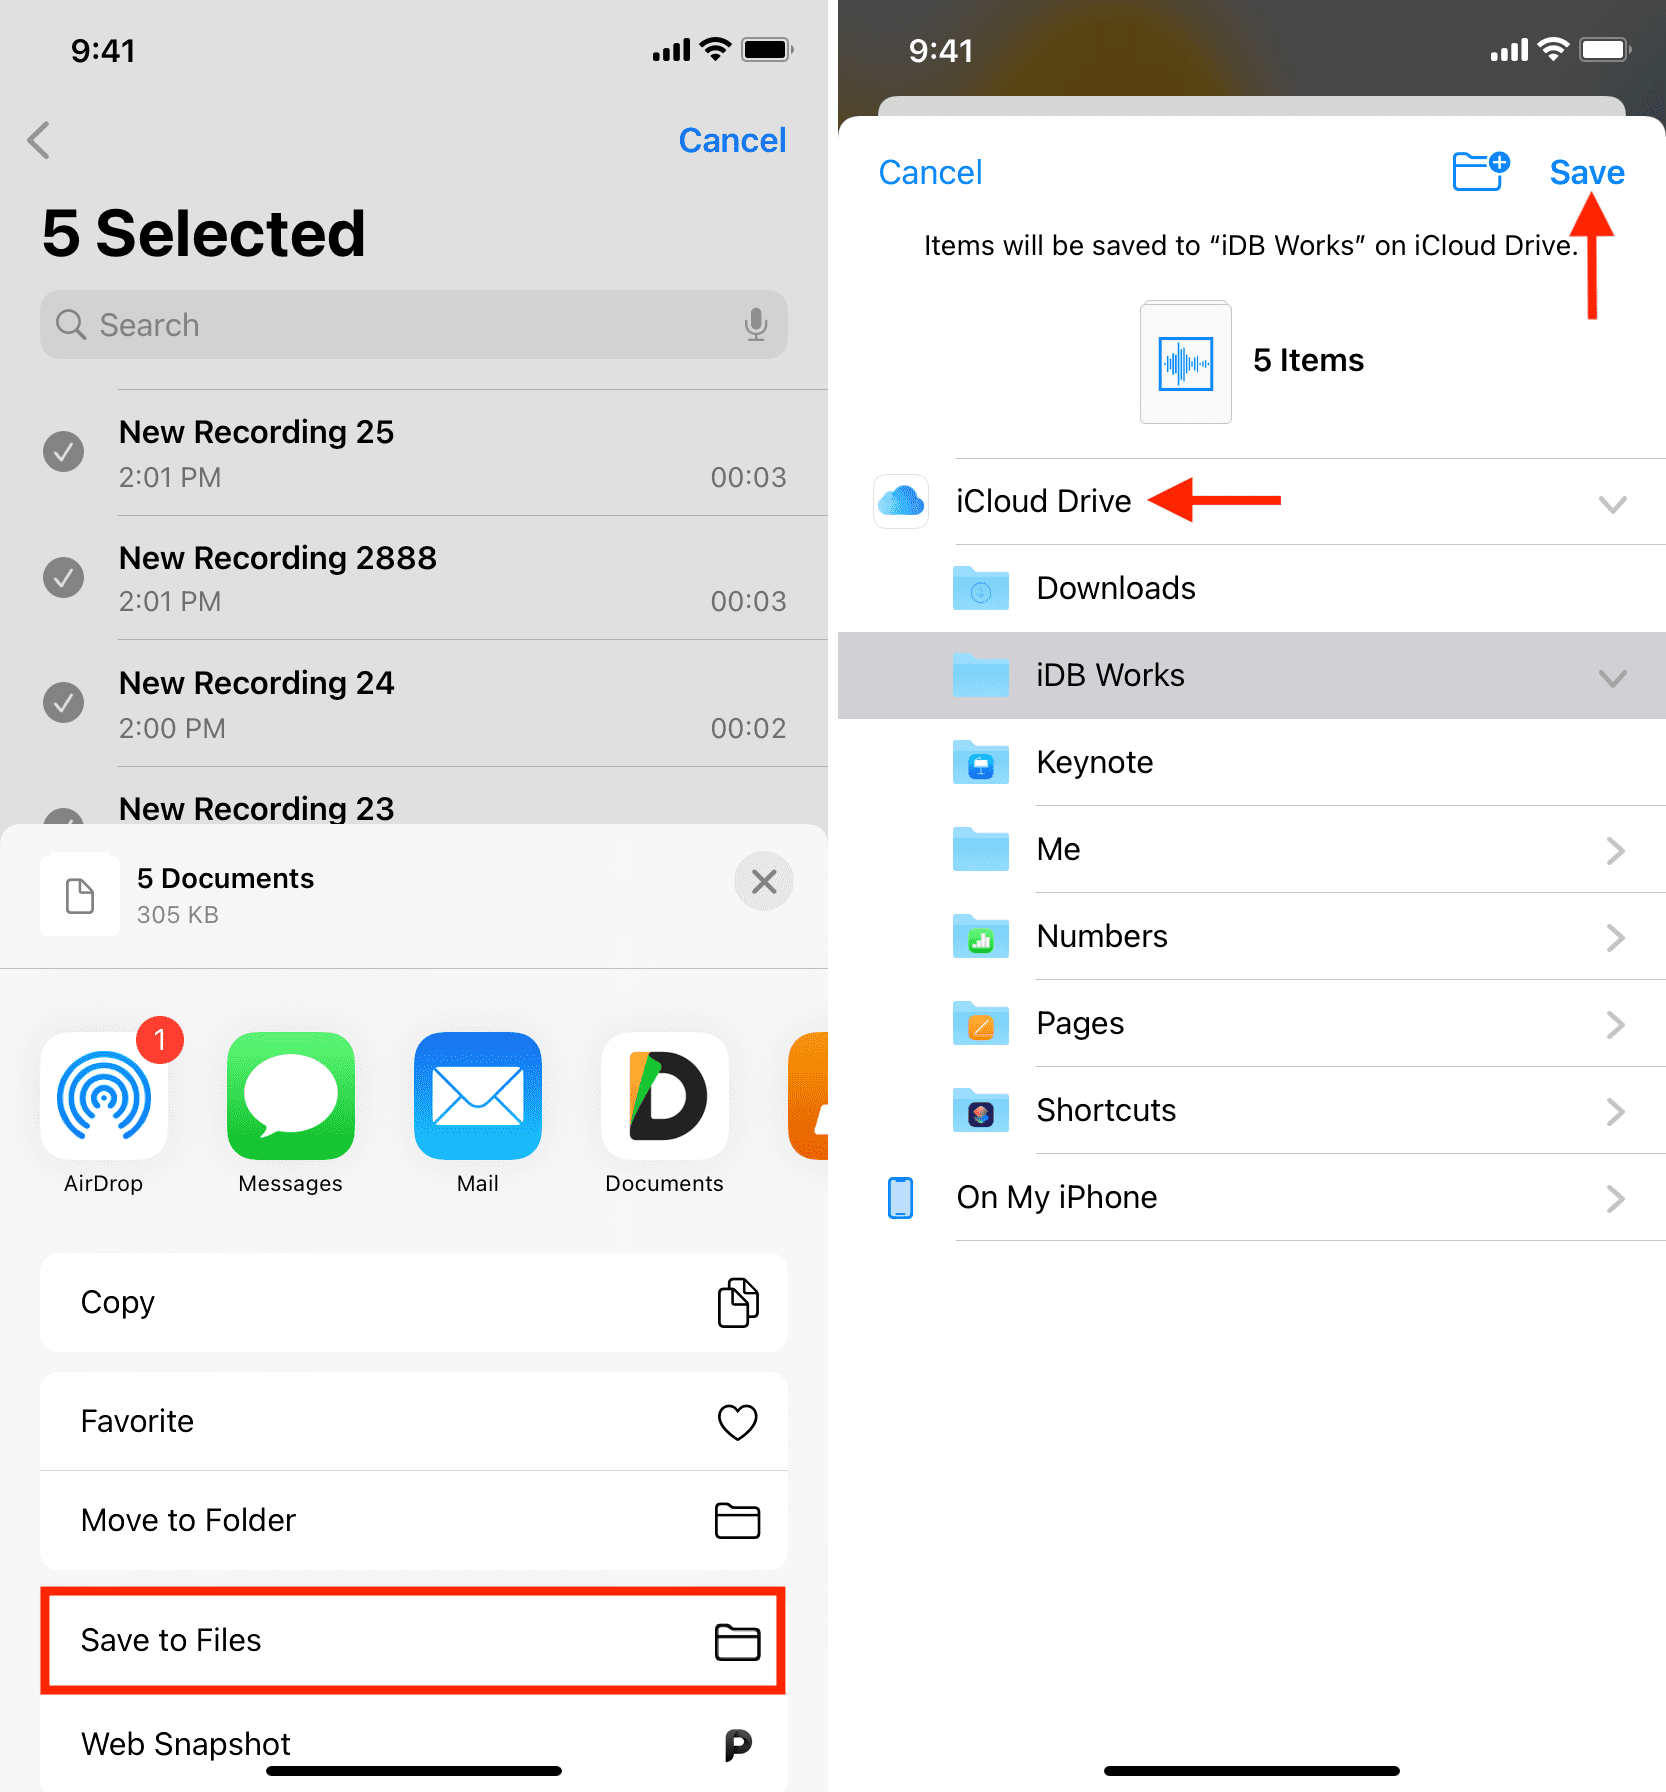
1) Inside the Voice Memos app, tap Edit > select the voice notes > share icon.
2) Tap Save to Files > iCloud Drive > Save. Please give it a while to upload.
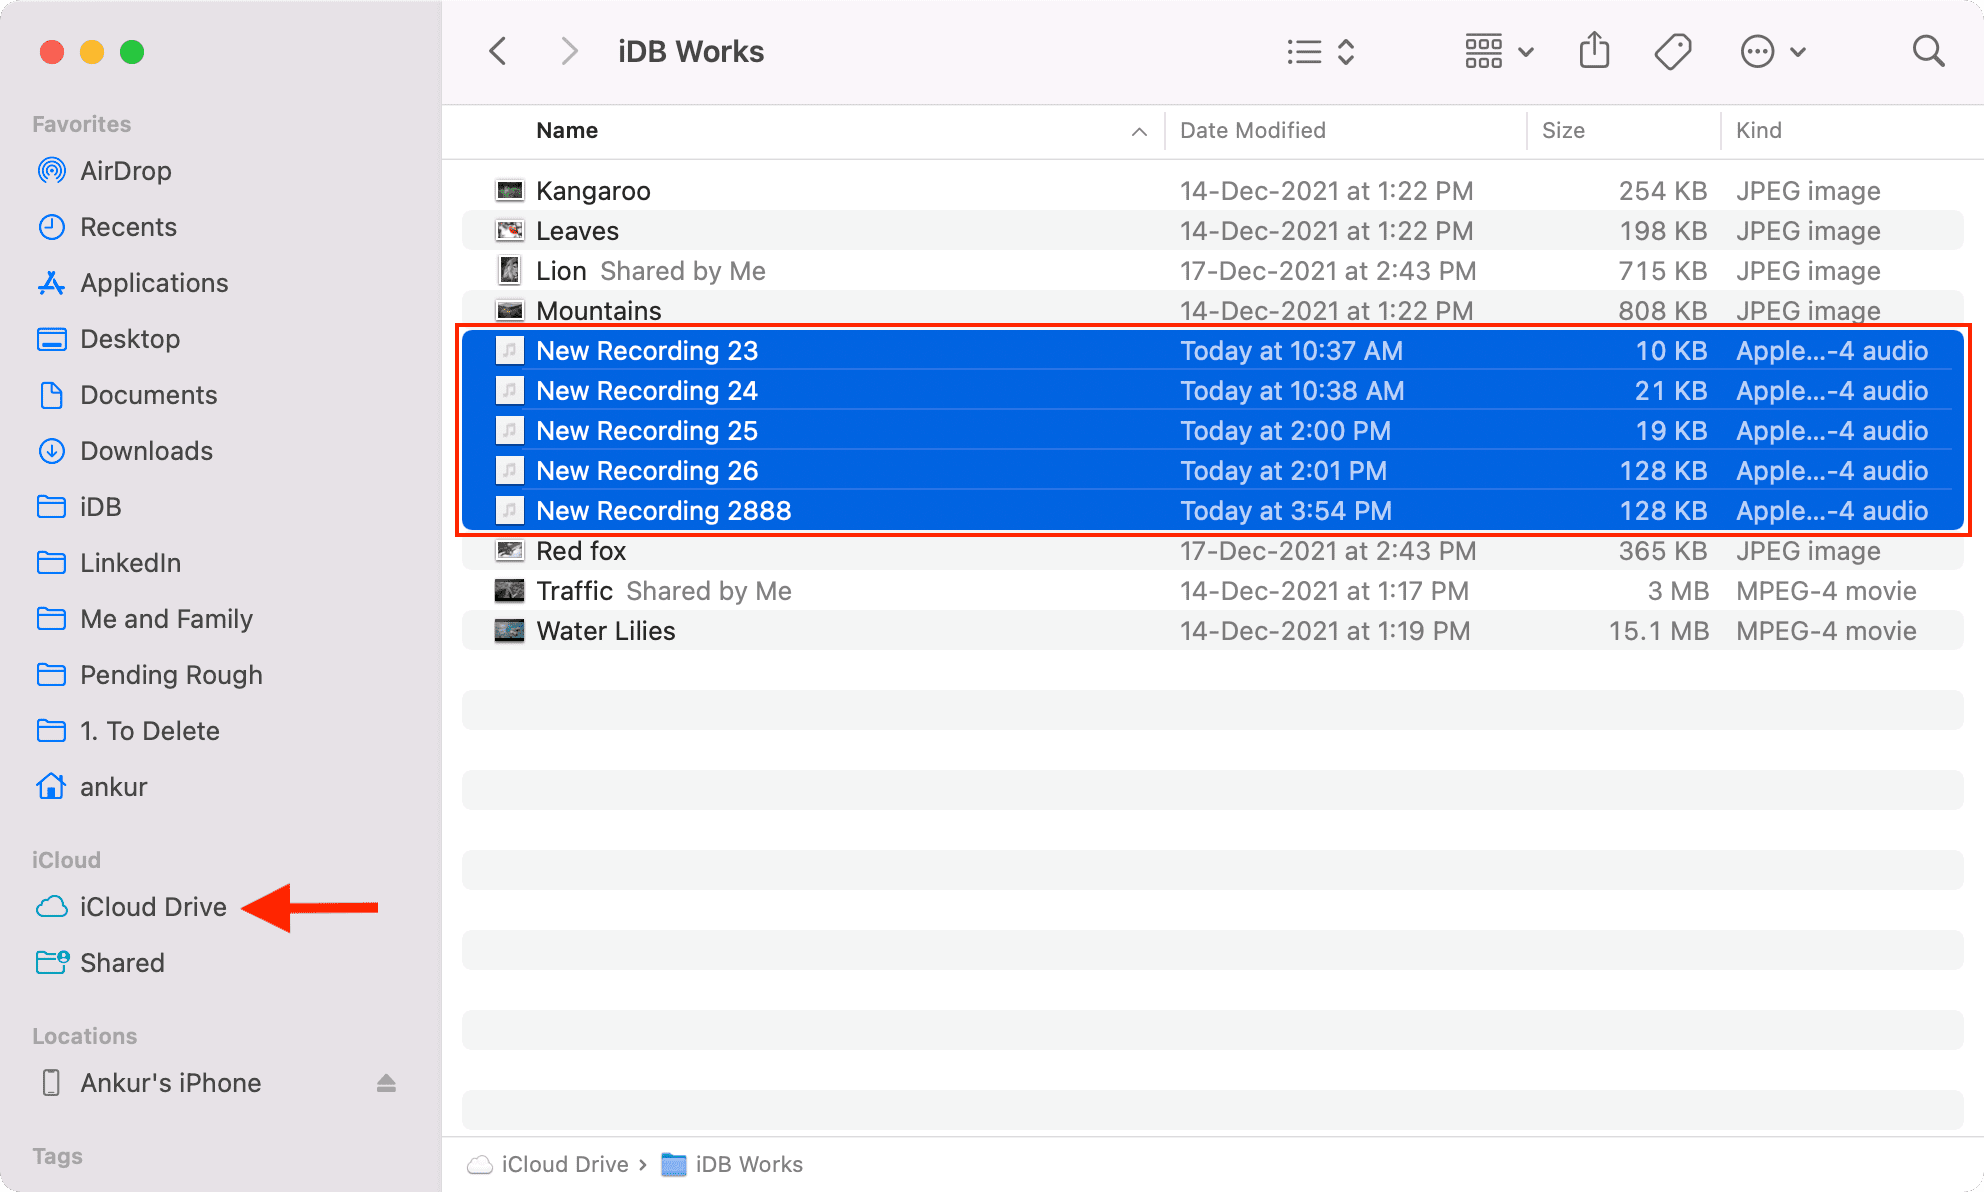
3) On Mac: Open Finder and click iCloud Drive from the sidebar to see your voice recordings. If you don’t see iCloud Drive here, that means you have disabled it. In that case, go to System Preferences > Apple ID > iCloud and enable iCloud Drive. Or, use the browser method explained below.
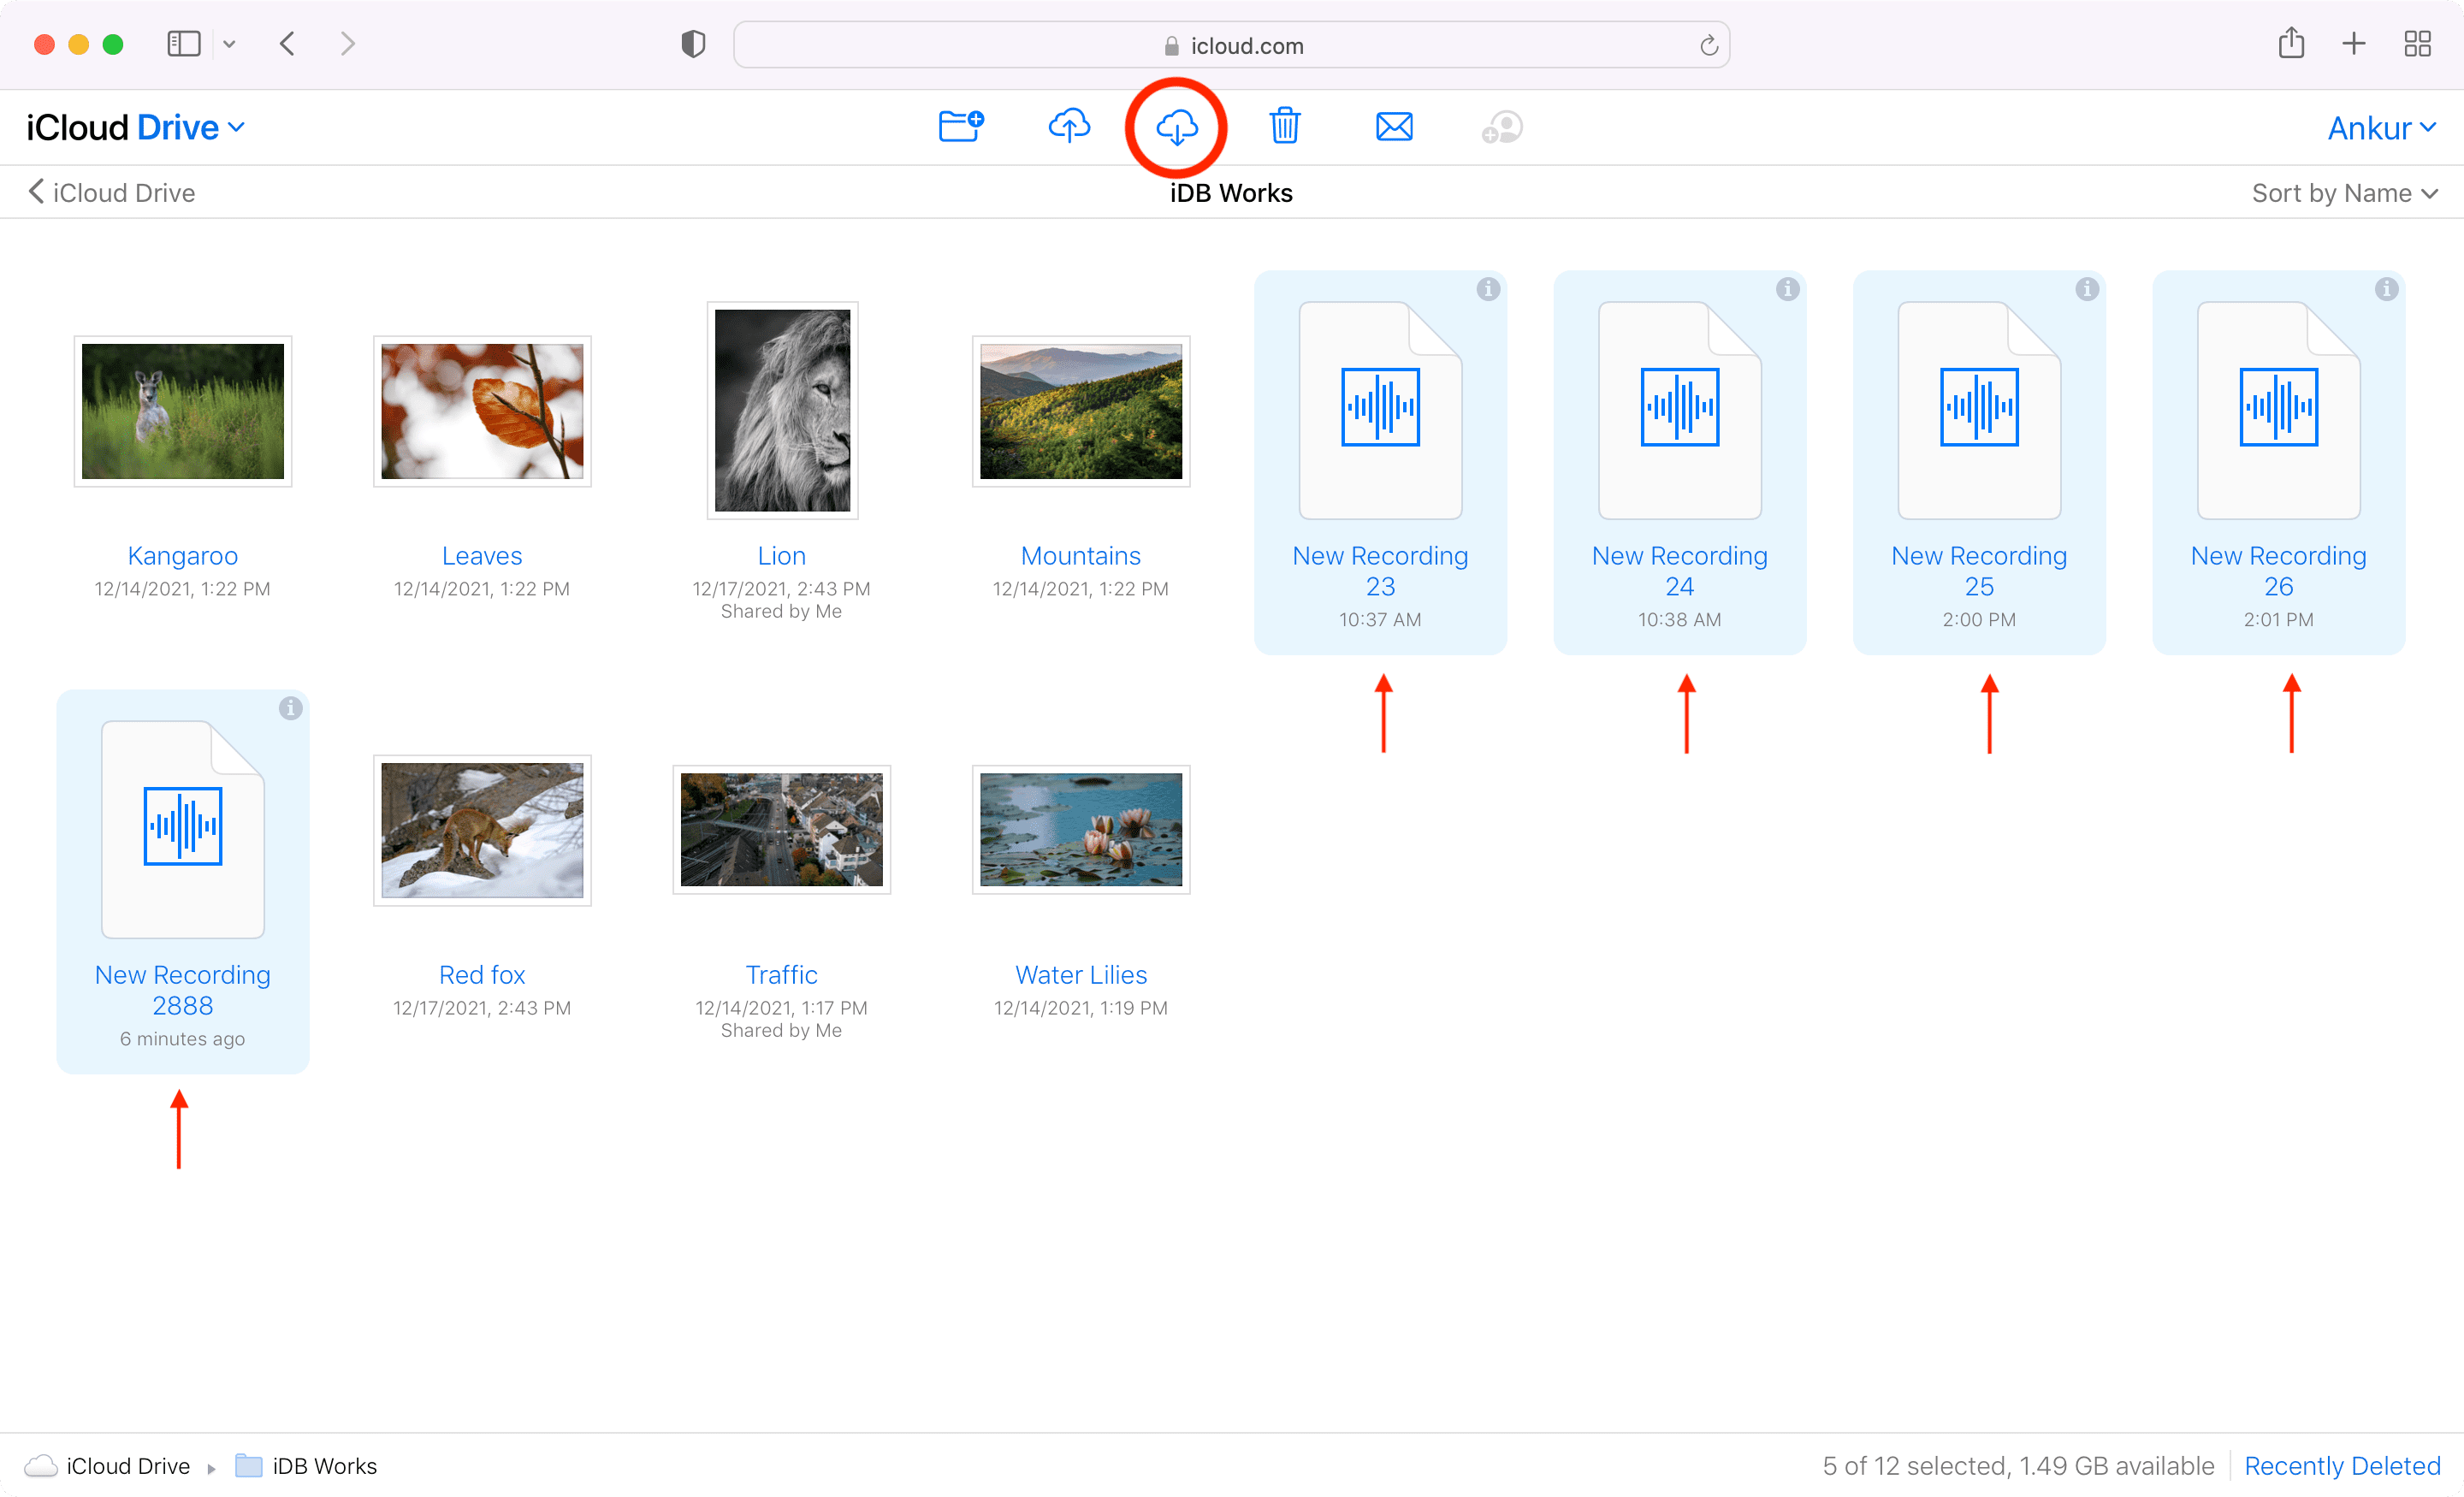
4) On Windows PC: Visit iCloud.com and sign in using your Apple ID. Click iCloud Drive and locate the voice recordings. Select a voice recording and click the download arrow. If you have multiple recordings, press and hold the Control key (Command for Mac), select the voice recordings, and click the download icon. The selected voice memos will download as a ZIP file.
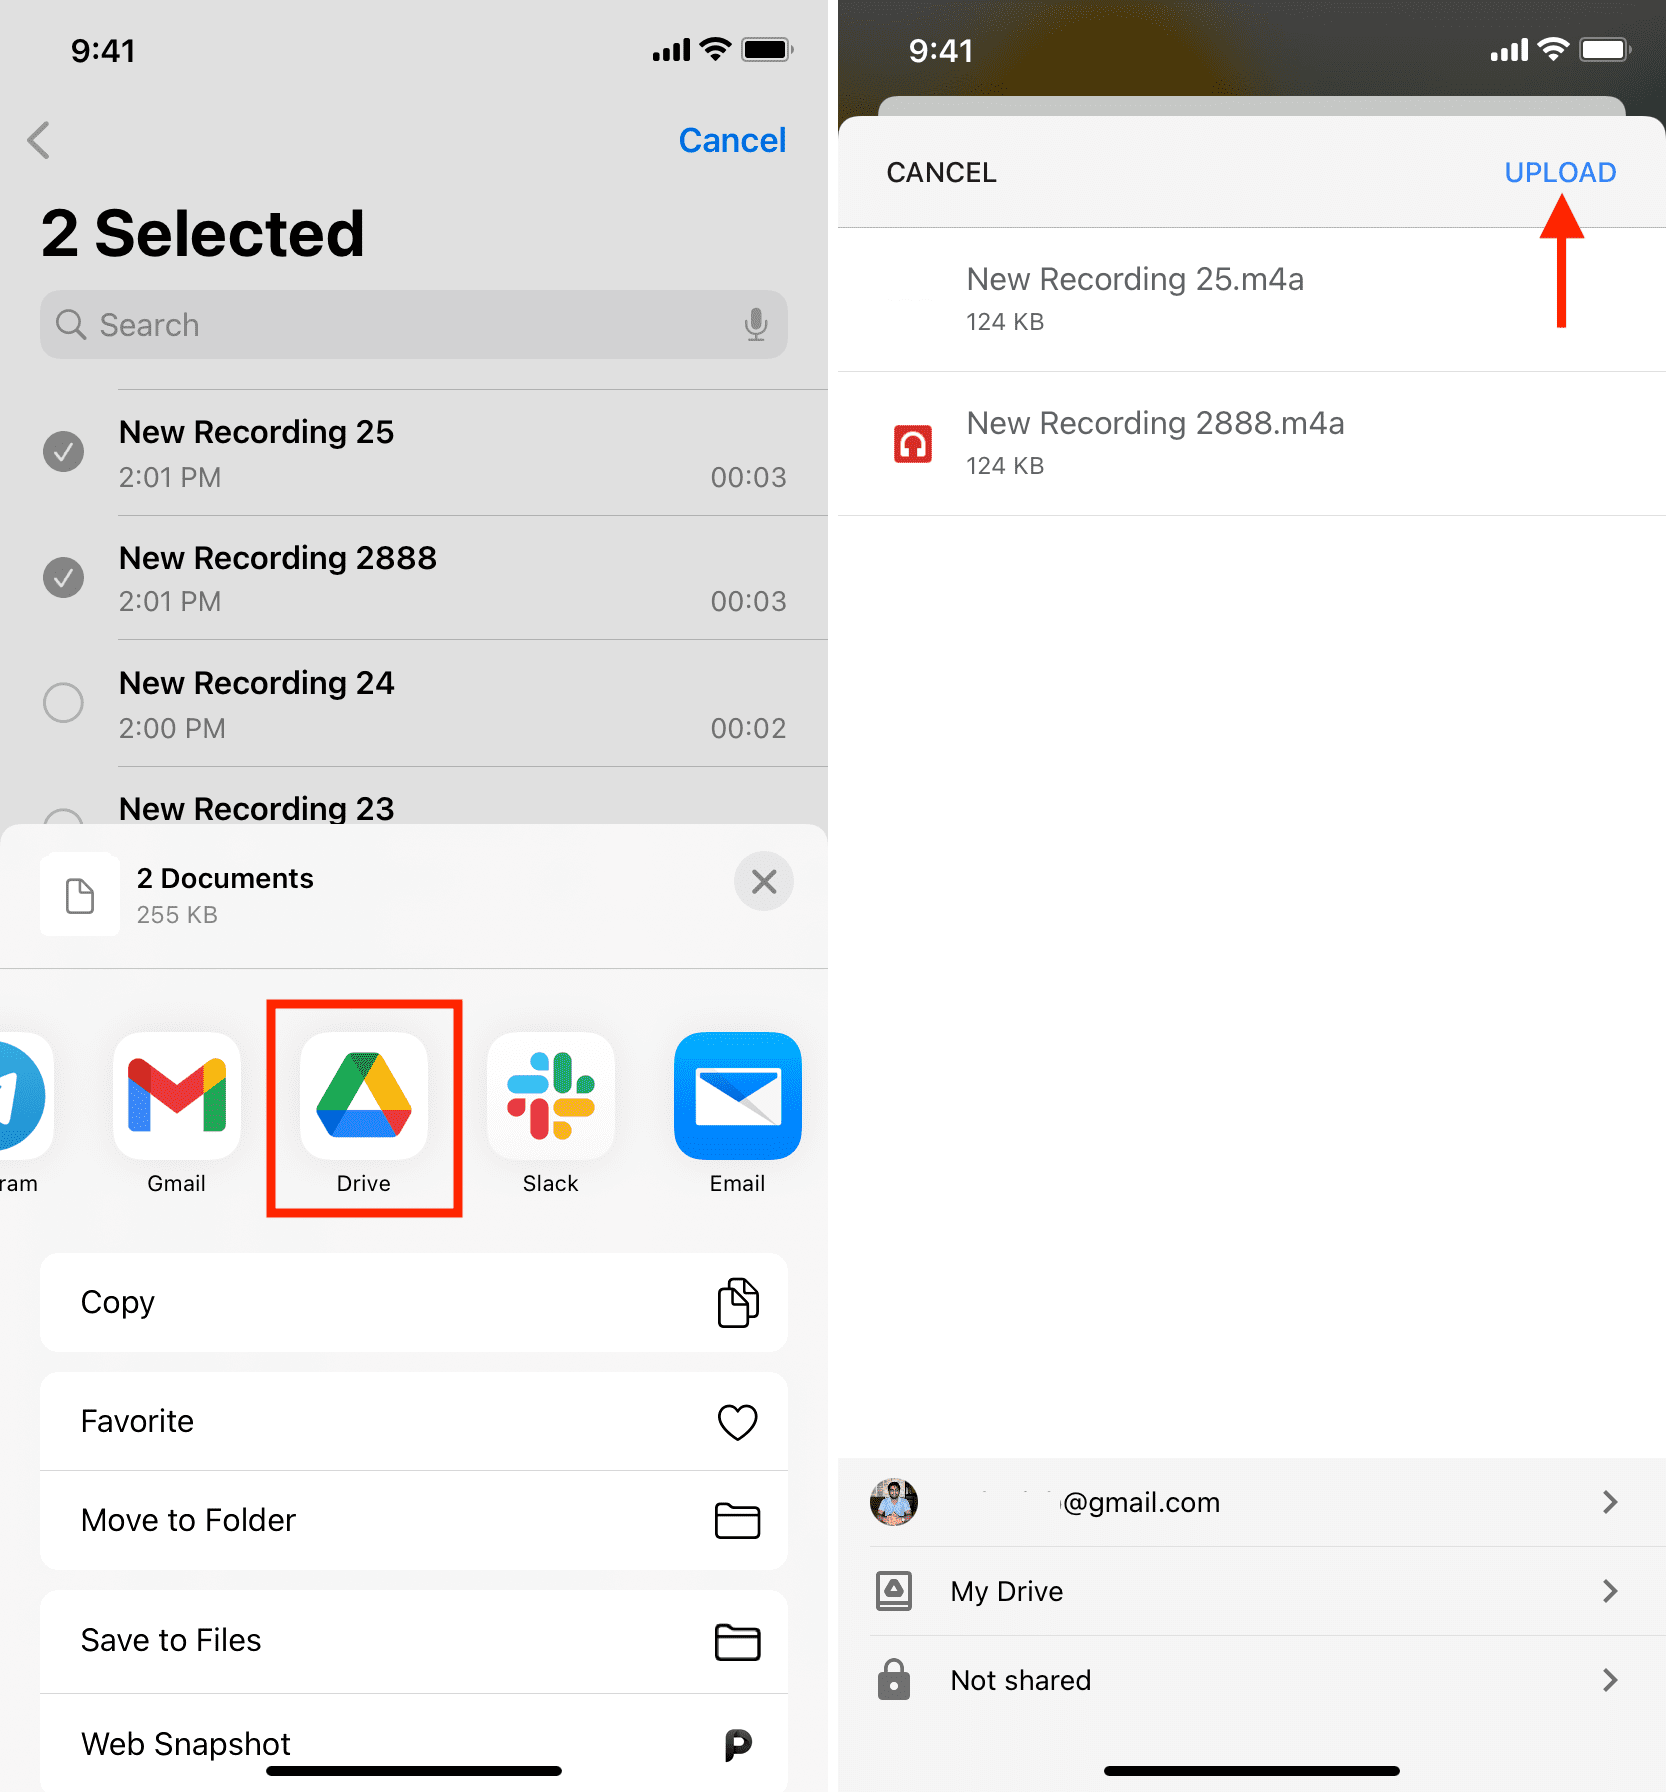
5. Use Google Drive (or other cloud storage) to transfer voice memos
- From: iPhone, iPad
- To: Mac, PC, Android phone
You can enable Google Drive, Dropbox, OneDrive, Box, etc., in the Files app and follow the same iCloud Drive method (explained above) to save the voice recordings and access them.
Or, select the voice notes in the iPhone Voice Memos app, tap the share icon and choose Google Drive > Upload. Wait for the voice recordings to upload. Once that’s done, visit Google Drive using any browser on your Mac or PC to download the iPhone voice memos.
6. Transfer voice memos via iTunes
- From: iPhone, iPad
- To: Windows PC and old Mac
Because Apple has retired the iTunes app, this method should only be used if you are using an older Mac running macOS 10.14 Mojave or earlier, or an older Windows PC. If you are using a newer Mac or PC, we highly recommend you use the Share sheet method described at the top of this article.
Exporting voice memos to your computer is a lot simpler than you may realize. It requires you to connect your iPhone to iTunes. There is not much more after that. In the few steps listed below, we will show you how to import voice memos into iTunes. Note that the process is exactly the same whether you own a Windows PC or a Mac.
WARNING: Although very simple, using iTunes to import your voice memos can mess up your iTunes library. This post assumes that you are connecting your iPhone to your own iTunes library and that you sync your music between iTunes and your iPhone. The risk is that if you have songs on your iPhone but none in your iTunes library, the syncing process might overwrite what’s on your iPhone. That means it could potentially delete the music on your iPhone. You have to be very careful and be sure the music that’s on iTunes is the music you want on your iPhone. If no (and regardless of the situation), it is a much better solution to simply transfer the voice memos to your computer using one of the methods described above.
1) Connect your iPhone to your computer.
2) Open iTunes on your computer and select your device in the top header (the icon that looks like an iPhone).
3) Select Music from the tab options in the sidebar.
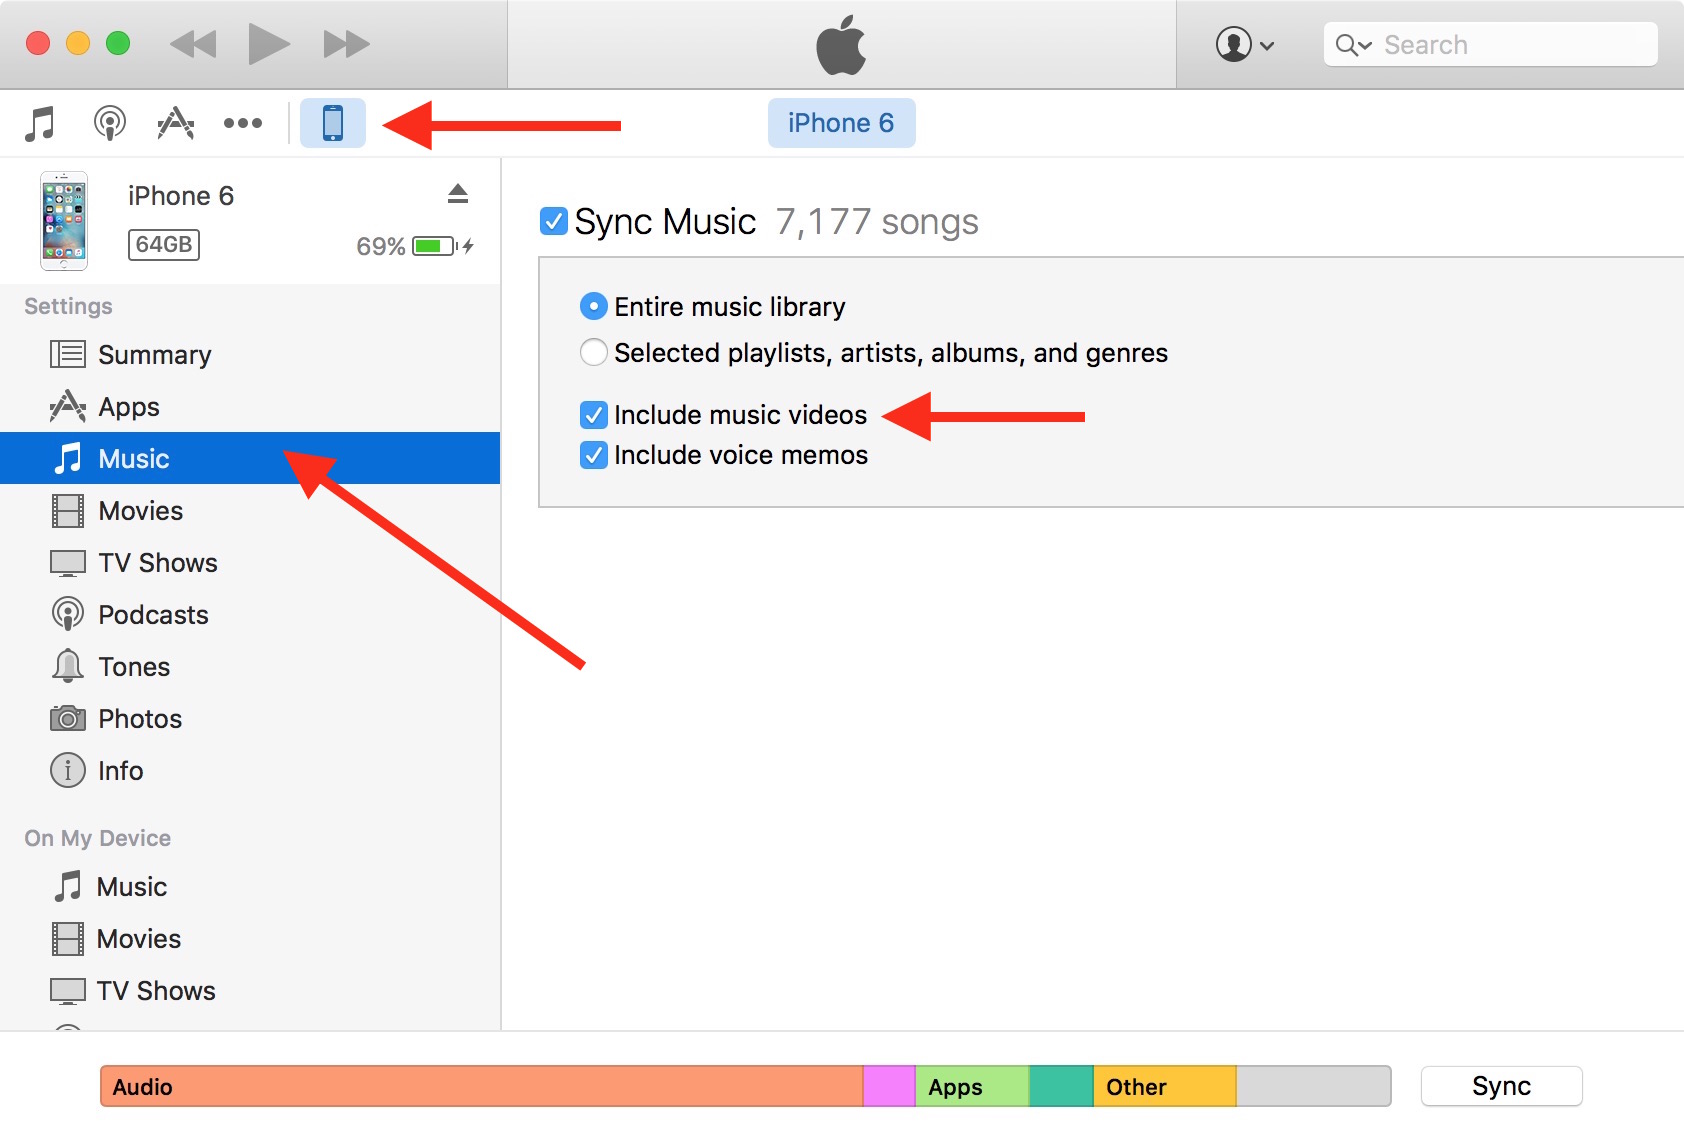
4) Select Sync Music and then select Include voice memos. This setting will extract your voice memos and load them into iTunes.
5) Click Apply in the bottom right corner of iTunes. iTunes will then sync with your iPhone and download your voice memos to your computer.
How to find your voice memos in iTunes
Once you’ve synced your voice memos with iTunes, they will be added as a specific category called Voice Memos.
Select the Music icon from the top navigation bar in iTunes, then select Playlists from that top navigation bar.

From there, you can play the memos, but you can also drag and drop them to your computer’s desktop and put them in folders or share them via email, for example.
Finding your voice memos on your Mac or PC
If you have a PC, you can find your voice memos in this folder:
C:\Users\(your username)\Music\iTunes\iTunes Media\Voice Memos
If you have a Mac, you can find your synced voice memos here:
Macintosh HD > Users > (your username) > Music > iTunes > iTunes Media > Voice Memos
FAQ
What happens to the voice memos I create on my Apple Watch?
The voice recordings on your Apple Watch sync to the Voice Memos app of your iPhone when both devices are connected. Make sure to enable Bluetooth and Wi-Fi on your watch and iPhone.
Can I change the format of voice recordings on iPhone?
You cannot change the format of voice memos on the iPhone. All voice recordings are in .m4a format. But you can change their quality by going to iPhone Settings > Voice Memos > Audio Quality. From here, choose Lossless (high quality) or Compressed (low quality).
You will also like: