With the release of iOS 4.3.2 this late last week, and the new iOS 4.3.2 redsn0w jailbreak still not completely stable, some of you might not want to wait any longer for a stable jailbreak, or maybe you’re having additional issues with the new OS. Whatever the reason might be, you can downgrade from your current iOS version to an earlier version using your SHSH blobs on file.
It is important you have your SHSH blobs on file for the iOS version you want to downgrade to. If you don’t have your SHSH blobs on file for the iOS you want to downgrade to, you will not be able to downgrade. You can check which SHSH blobs on file you’ve got by launching Cydia and looking at the top of the Cydia homepage where it lists all your saved SHSH blobs.
Follow the tutorial below to downgrade your iPhone on iOS 4.3.x, to iOS 4.3.1, 4.3, 4.2.1, or 4.1.
NOTE: This will not downgrade your iPhone baseband.
Downgrade iPhone 4.3.x to 4.x
Step 1: First, download the iOS version you want to downgrade to from our Downloads section here. Save it to your desktop.
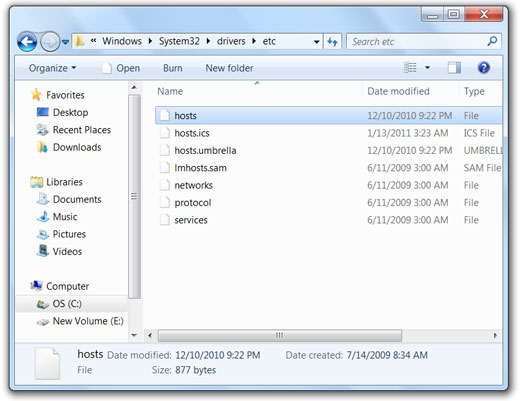
Step 2: Now we must trick iTunes into thinking that it is watching Apple servers, while it is really going to change the address to Saurik’s server (where your SHSH Blobs are saved). To do this (Windows users) go to:
C:/Windows/System32/drivers/etc locate the“hosts” file and then open it with Notepad (make sure to right-click and select “Run as Administrator”).
If you are Mac OSX user, navigate to GO -> Go to Folder and enter the path “/etc” and open the file “hosts” with TextEdit.
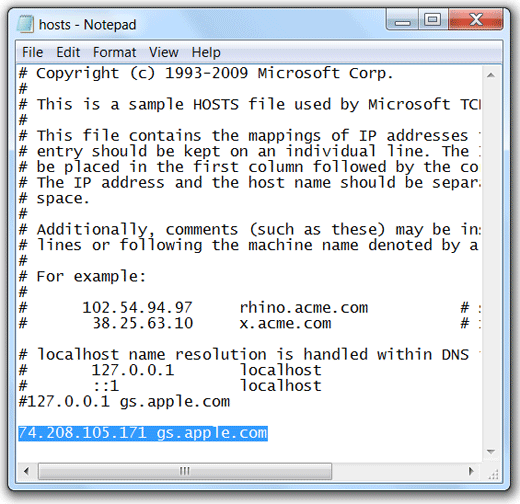
Now add the following hostname at the end of the file as shown in the screenshot below. Save the file:
74.208.105.171 gs.apple.com
Step 3: Next, put your iPhone in DFU mode
Step 4: When you’ve successfully entered your iPhone into DFU mode, iTunes will automatically launch and a pop-up will inform you that your iPhone is in DFU mode.
Now hold down the Shift key (Windows users) or the Option key (Mac OSX users) while clicking the Restore button in iTunes. A dialog box will pop up and you’ll be able to choose the firmware you want to downgrade to, downloaded in Step 2.
Step 5: During the restore process, iTunes might give you error message 1004 or 1013, don’t panic! This is completely normal. Simply click “ok”.
Step 6: Your iPhone should now be stuck in recovery mode, showing the “connect to iTunes” logo. To get out of this, simply download (Windows) (Mac) this standalone .exe file to fix recovery on 4.3.1. Extract the file and double click on fixrecovery43.exe. A command prompt will open, and the program will go through the process. During this time, you will notice scrolling text on your iPhone 4. Your iPhone will reboot.
Congratulations! You’ve successfully downgraded your iPhone firmware.
You can proceed to jailbreak your iPhone by following our tutorial here.